Showing posts with label panini 101. Show all posts

Thursday, April 24, 2008

How to Make Panini

Panini 101Now that I've got a lot of sandwich-grilling experience under my belt, I thought I'd pause for a moment and share what I've learned about how to make great panini. What would a Panini 101 series be without a good, old-fashioned "how-to" guide? So here it is: your step-by-step guide to successfully making any type of panini you can dream up.

Step 1 - Invest in a good panini press

Breville Ikon Panini PressYup, I said it. If you think you're likely to make panini more than just a few times, I'd highly recommend buying a grill. I've tried several different panini-making methods and the panini press was, by far, the easiest and produced the best results. A lot of people will tell you can make good panini with two skillets - if that works for them, that's great. But if you ask me (and you are, if you're reading this!), I say get the press. What features should you look for? Get one that allows you to regulate the temperature and the amount of pressure on the sandwich. Some models come with removable grates, which is really helpful when it comes time to clean up. I personally use the Breville Ikon Panini Press, sold at Williams-Sonoma.

Step 2 - Pick your bread and fillings

Brush olive oil on your bread for a savory crunchOne of the best attributes of panini is that they're infinitely versatile and customizable. There's a good chance you have all the ingredients you need right in your fridge and pantry right now. A few things to keep in mind:

  • Denser is usually better, when it comes to choosing bread. You want something that can stand up to and will be enhanced by the grilling process. My favorites are ciabatta and sourdough - french and rye work really well too. Slices about 1/2" thick are best - any thicker and your sandwich is likely to be "bready"; thinner slices may flatten out too much in grilling. Want to give your bread a nice, crisp crunch? Brush a little olive oil or melted butter on the outsides before grilling.

  • Experiment with your favorite flavors. 
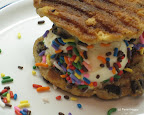
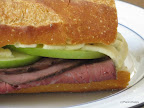
Re-create your favorite classic sandwiches or invent entirely new combinations. In the U.S., panini generally include cheese - it's a great opportunity to explore the specialty cheese section of your grocery store to discover new flavors. Got leftovers? Turn them into panini! Last night's roasted chicken tastes even better today with some swiss cheese bacon and tomatoes on sliced sourdough. Looking for some inspiration? Check out my recipes!


  • Less is more. Remember - you want everything to stay inside your panini so be sure not to overfill the sandwich!

Step 3 - Heat the grill

Adjust the grill temperatureHow high should I heat the grill? That depends on what you need the heat to do for your sandwich. With thinner panini like simple grilled cheese, where all you need to do is melt the cheese and grill the bread, a medium-high temperature (about 375 degrees) works great - 3 minutes and it's perfect. If you've got a more substantial sandwich, with meat that needs to be heated through, I'd recommend using a low heat setting (about 200 degrees) and grill for about 10 minutes. In either case, it's a good idea to lift the lid and check periodically. And if you start to hear the sizzle of cheese on the grates, that's a sure sign it's melted!!


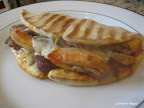
Step 4 - Grill your panini

Adjust the amount of pressure on the sandwichA major advantage a panini press has over other types of grills or the two-pan method is that you can regulate the amount of pressure on the sandwich. If you've ever over-pressed a sandwich such that all the fillings squeezed out, leaving you with bread-on-bread you know the mess I'm talking about! Just as carefully as you place your panini onto the grill, also take care to lower the lid slowly until it makes full, secure contact with the panini. As the cheese melts, the panini will flatten further. Again, keep an eye on things and you shouldn't have any surprises.

Step 5 - Eat now!

Enjoy!Here's a step that shouldn't be hard to follow! Panini taste best right off the grill, while the bread is still nice and crispy and the fillings are hot. Got a crowd coming over? Prepare the panini ahead of time and grill them right before you're ready to serve. If you must reheat panini, a toaster oven is best - about 8-10 minutes at 275 degrees. DO NOT MICROWAVE PANINI (unless you have a tool like the Micro Grill), as it will make the bread chewy and soggy and that's just not appetizing.

These are the steps I take to my panini and I've been pleased with the results. I hope they're helpful to you as well - and, by all means, please share any other tips that have worked well for you!


Hungry for more? Check out the other posts in the Panini 101 series:

Wednesday, February 20, 2008

8 Tips for Making Great Panini

Panini have been around for centuries, and these days they're being grilled up in practically every corner café in America. The popularity of grilling panini at home reached a fever pitch when Oprah Winfrey featured the Breville Ikon Panini Press among her 2007 "favorite things". That model (which I use) and many others began selling out in housewares stores everywhere. Here are 7 tips that will ensure that the panini you make at home are as scrumptious as can be.


1. Choose your grilling method wisely. As I learned in the "Grill Method Smackdown", not all panini grilling methods yield the same results. A panini press may be the easiest to use and provide the greatest amount of control over heat and pressure, but it's also the most expensive option. Many people are able to grill sandwiches just fine with a grill pan and/or skillet...although this method can be unwieldy and cumbersome to execute. It all comes down to your personal taste and, perhaps, the frequency with which you plan to grill panini.

2. Experiment with a variety of breads and fillings. Just because panini originated in Italy doesn't mean you have to limit yourself to foccacia, mozzarella and other Italian ingredients. Or even just savory ingredients. If it's got bread and fillings and is prepared on the grill, it's a panino! Try dessert recipes, breads like pita and biscuits, and fillings like mango salsa and apples. Let your taste buds be your guide and have fun with it!

3. Go for the crunch. What separates panini from "regular" sandwiches? It's the grilling! Grilled bread is the hallmark of panini - make the most of it by brushing olive oil or melted butter on top for a crostini-like crunch. Or, to save a few calories, Columbus Foodie recommends spraying butter flavored cooking spray, another great idea.

4. Be careful with "wet" ingredients. No one likes a soggy sandwich. Many of the great fillings we enjoy on "regular" non-grilled sandwiches, such as tomatoes and juicy meats, sometimes aren't ideal candidates for panini, where crispness is key. Does that mean these fillings are out of the question (and the panini) entirely? Absolutely not! Just look for ways to contain the excess moisture. For example, add panko breadcrumbs to fish and remove seeds from tomatoes. Another great tip comes from celebrity chef Tom Colicchio (thanks to Foodie Obsessed for mentioning it!): put your wet ingredients in the center of the sandwich.

5. Keep round tops turned in. If you try to grill round-topped breads, like baguettes, you'll find it can be a real challenge to keep them from rolling over and spilling out the contents of your panini. The answer to this dilemma - a great technique I heard about on the Baking Bites blog: turn round-topped breads inside out so that the flat surfaces make contact with the grill. Genius!

6. Cut with a straight-edged knife. A sharp, straight-edged knife, rather than a serrated one, will ensure a smooth separation for your finished panini.

7. Have a panini party! The best to know if your panini are hitting the mark is to test them out on friends and family. Buy a selection of breads and fillings, fire up the grill, and allow your guests to create their own panini combinations. You may even glean some new ideas!

8. Greens go last. Love to include lettuce in your panini, but can't stand to have them wilt in the grilling process? Food Network's George Duran (aka "Ham on the Street") offers a great solution: stick 'em in last. Grill your sandwich and then insert anything you'd like to keep leafy - lettuce, spinach, arugula, cilantro to name a few - right before serving.

Do you have other tips? Share them in the comments!

> More from the Panini 101 series:

Are the tips in this post helpful? If so, give it a Stumble and share it with others who like to cook!

Tuesday, February 19, 2008

Ingredients to Keep on Hand


If you have certain basic items on hand at all times great panini will just be minutes away. Of course, it's all a matter of personal taste. After making a few different panini you'll start to recognize the flavors you like best. Here are some suggestions to get you started.

Bread


MUST HAVE: Sliced sourdough - it grills well and is also excellent for non-grilled sandwiches and breakfast toast, so you're not likely to waste it
NICE TO HAVE: Pita, rye, ciabatta, focaccia, raisin bread, puff pastry, english muffins, french rolls

Cheese

MUST HAVE: Sliced cheddar - goes well with many types of sandwiches, or great as a snack on its own
NICE TO HAVE: Asiago, mozzarella, pepper jack, blue cheese, swiss, havarti, gruyere, provolone

Meat

MUST HAVE: Deli meats - any deli meat can be a good candidate for panini
NICE TO HAVE: Rotisserie chicken, fish filets, eggs, bacon, prosciutto, flank or skirt steak, turkey, shrimp, pulled pork

Condiments

MUST HAVE: Mustard, mayonnaise, olive oil, butter - these versatile ingredients are great accompaniments to nearly all types of panini
NICE TO HAVE: Pesto spread, olive tapenade, sundried tomato spread, mango chutney, peanut butter, preserves

"Goodies"

Often it's the "extras" that make the sandwich: red onion, avocado, apples, spinach, arugula, tomatoes, chocolate

Stock your refrigerator and pantry and get grilling!

More from the Panini 101 series:

Monday, February 18, 2008

The Grill Method Smackdown


Do I need a panini press to make panini? Can I just use my Foreman grill? How about a grill pan or skillet? There seems to be quite a bit of debate on cooking forums over which grilling method makes the best panini? Oh, and people are very adamant that their method is the best. But, you know, I haven't ever seen anyone mention that they've actually tried more than one method...so how can they truly know if one is better than the other? So I decided to make myself the guinea pig upon realizing that I actually had the tools on hand to make panini in three common ways. The truth is, all of these methods will work - BUT, I learned that some methods produce better results and are easier to execute than others. Want to know the pros and cons of each method? Read on!


THE TEST SUBJECT: Good ol' basic grilled cheese sandwich - cheddar cheese on sliced sourdough, with melted butter brushed on top. I prepared identical sandwiches using each method.

NOTE: This experiment could hardly be construed as scientific, but will hopefully shed a little light on the differences between three popular panini grilling methods.


Panini Press


(model tested: Breville Ikon Panini Press, Williams-Sonoma, $99.95)
PROS: Best results, even heating, easy to use, regulate grill height and heat
CONS: Cost, takes longer to heat
Not surprisingly, the machine that was designed specifically to make panini produced the best results! What gives it the advantage is that it allows you to regulate both the grill height and heat, which are vital to making panini that are crispy on the outside, cooked on the inside, and adequately (but not overly!) pressed. My grilled cheese sandwich came out nice and evenly crispy on the outside with perfectly melted cheese on the inside. The grill produced shallow golden grill marks. And it was incredibly easy - just assembled the sandwich, put it on the grill, closed it and the machine did the rest. A perfect grilled cheese sandwich with little fuss - what more can you ask for?

What is the downside to this great gadget? Well, some would say the price. At $100, it's not the cheapest appliance in your pantry. If you anticipate only making panini on very rare occasions, it will probably be difficult to justify the expense. Note that there are, however, a wide range of models available, many of which are less expensive. Also, compared to the other two grill methods I tested, the panini press took the longest to heat up initially and to grill the sandwich. So if time is of the essence, one of the other methods may be preferable.

George Foreman Grill


(model tested: The Champ GR10AWCAN, now discontinued)
PROS: Fastest, easy to use, even heating
CONS: Poor crisping, cannot regulate grill height or heat

Ah, the Foreman grill! So many of us have these tucked away in our kitchens and we love them. But can they make good panini? I would say, "Yes, but..." The model I tested, which I received as a gift about 8-10 years ago, heated up incredibly quickly - in about a minute. Just like with the panini press, it's incredibly easy to use - just load the sandwich on the grill, close it, and wait. Because the heat comes from both the top and bottom it's distributed evenly, which is essentially for good panini. However...

How could I tell the sandwich was done? By the sizzle of a whole lot of cheese that escaped and was bubbling all over the grates! Unfortunately, due to the fact that you cannot regulate the height of the grill (it's possible this feature now exists on newer models - I'd welcome any comments on that), the sandwich was smushed too much, causing the cheese to ooze more than would be desired. Also, even though the heat was distributed evenly, I couldn't regulate it (again, this may now be possible on newer Foreman grill models) so the sandwich cooked too fast and did not come out as toasted and crispy as it did on the panini press. If you're looking to make panini and you've already got a Foreman grill, you may be able to make halfway decent panini without incurring the expense of a panini press.


Grill Pan + Cast Iron Skillet


(models tested: Calphalon One Nonstick 11-Inch Square Grill Pan, Amazon.com, $49.99; Lodge Logic 10-1/4-Inch Pre-Seasoned Skillet, Amazon.com, $12.99)

PROS: Cost (if you already have the pans), grills quickly
CONS: Uneven heating, challenging to regulate grill pressure, cumbersome, FIRE!!

Granted, some people may be more adept at executing this method - but I'm not exactly a novice in the kitchen and I had a really hard time coordinating the two pans to any degree of success and damn near started a fire in the kitchen! The most common reason people advocate this method of grilling panini - pressing a sandwich between two heated pans on the stove - is to save on cost. You've already got the pans, they say, so no need to buy any special apparatus to make panini. And, unlike with my Foreman grill, you can regulate the heat to some extent - at least on the bottom - by adjusting the flame on your stove. As a result, this can be a relatively quick grilling method if you raise the heat high enough.

Alas, due to the fact that you can't regulate the heat on the top, I found I was left with uneven heating. As a result, my sandwich did come out nice and toasty with great grill marks on the bottom...but the upper half of my sandwich actually stuck to the skillet!! If you've ever tried to lift a hot 10" cast iron skillet with one hand (that's currently afflicted with tendonitis due to carrying around an infant!) and a spatula to scrape off half a grilled cheese sandwich in the other you'll know that it is not an easy or particularly safe task! Also, because I was unable to regulate the pressure with which the sandwich was pressed, a lot of cheese escaped out of the sides. I may have had more success if I'd just used one pan - the grill pan - and flipped the sandwich mid-way through. But then I'd need something else heavy, like a foil-covered brick (which I don't have lying around the house) to press it.

And, oh yes, the near-fire - after I'd preheated my skillet I went to lift it with potholders and one of my potholders must have gotten a little too close to the flame. Next thing I know I smell this fume-y odor and notice char marks on the potholder - yikes! I'm just saying...if I didn't have to mess around with maneuvering the skillet (a task I try to minimize) it wouldn't have happened. Perhaps you all are more coordinated than I :-)

The bottom line...

You can make great panini with a panini press, a Foreman grill or a grill pan/skillet - it's all a matter of taste and your preference for convenience, ease and cost. Disagree with any of these results? Try the smackdown in your own kitchen and let us know what you come up with!

More from the Panini 101 series: