Showing posts with label vegetarian panini. Show all posts

Sunday, May 4, 2008

Keeping it Simple


I feel myself heading into a phase - a "back to basics" phase. Some panini out there are just getting too frou-frou for me. Maybe it's the fact that we call them panini rather than just grilled sandwiches. They kind of sound fancy, so maybe we should fill them with fancy ingredients? It's certainly tempting. I'll be the first to admit that I've succumbed to the urge to use a roasted garlic aioli here and a dill-watercress salad there. But are hoity-toity ingredients really what panini are about? I don't think they have to be. My favorite panini recipes thus far have been the ones with the shortest ingredient lists and nearly no measurements - just simple, quality ingredients combined to create something wonderful.

It was this newfound "back to basics" mentality that led me to make a sandwich based on the simple, classic Italian caprese salad. Heirloom tomatoes, fresh mozzarella, fresh basil, some good extra-virgin olive oil and lemon zest - what more do you need? Want to skip ahead? Click here for the final recipe.


Tomato, Mozzarella & Basil Panini - Attempt #1
  • Bread: French baguette
  • Meat: None
  • Cheese: Fresh mozzarella
  • Condiments: Extra-virgin olive oil
  • "Goodies": Heirloom tomatoes, fresh basil leaves

THE INSPIRATION: You know, Gordon Ramsay isn't always the fire-tempered, abusive, profane (well, he is always profane) chef that he appears to be on "Hell's Kitchen". Or maybe I should say those aren't his only traits. I think the man just has high standards and low tolerance for mediocrity. This is far more apparent on his British show, "Ramsay's Kitchen Nightmares", which I have been watching religiously on BBC America as of late. He still verbally beats these restaurant owners and head chefs down to tears (I've learned lots of fantastic new swear phrases!), but once that's over with he seems genuinely dedicated to helping them turn their businesses around, improve their food and usually departs on very friendly terms. Usually.

Why do I bring up Chef Ramsay? His advice in almost every "Kitchen Nightmares" episode - sans the screaming - is to focus on simple, honest food. Dispense with pretentiousness and unnecessary flourishes. He believes in letting good, quality ingredients stand on their own. I can really appreciate that philosophy. Keep it about the food, not the cook. Wise words to cook by. So here's to f*&%ing simplicity in cooking!

THE PREPARATION: Slicing into an heirloom tomato is a little like opening a present on Christmas Day - there's a moment of excitement as you get to peer in and see what's inside. The often - I'll say it - ugly exterior doesn't provide many clues. I was pleased to see, as I began slicing into my bulbous red and brown tomato that it came out kind of heart-shaped and was dotted in an almost lace-like seed pattern. Pretty! I removed the seeds so the bread wouldn't get too soggy. With Chef Ramsay's Scottish bellow echoing in my ear, "TAYYYYSTE your FUUUUD!!", I sampled a little slice. So sweet!

At least the first tomato was. The second one I'd bought, a bright green one, was super-acidic and way too firm. Woopsie! Well, that's why I buy a variety of ingredients when I go shopping for these panini :-) I stuck with the pretty heart-shaped one.

Speaking of variety, I also bought two different kinds of mozzarella - one fresh and one low-moisture. Giada De Laurentiis just advised last week on the Food Network against using fresh mozzarella in dishes where you are looking to control the moisture. Generally, I'd say panini would qualify as such a situation. Still, I really love how fresh mozzarella tastes in caprese salads so I threw caution to the wind and sliced some up. Left the low-moisture stuff in the reserves just in case.

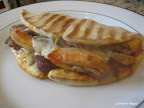
THE CONSTRUCTION: Since the tomatoes were the featured attraction on this sandwich, I chose a French baguette for bread based on texture rather than flavor. A nice big crunch was going to be a great complement to the relatively soft fillings.

Olive oil is usually an integral part of an insalata caprese, with a good amount of its fruity goodness drizzled over the top. For the panini version, I still wanted this great flavor but I thought a measured approach was in order. So I opted to brush some oil directly onto the insides of my baguette - that way I'd still have the great flavor without an excessive amount of oil seeping into the bread.

I lay down a couple of big, fresh basil leaves and added my lacy heart-shaped tomatoes on top. Then I seasoned the tomatoes with some sea salt and black pepper as well as some grated lemon zest. The lemon is kind of an optional ingredient in a caprese - sometimes you see it, sometimes you don't - but I really wanted to go for big fresh flavor on this sandwich and lemon always delivers. Lastly, I added two slices of my fresh mozzarella, closed up the top and set it on the grill at medium-high heat for about 5 minutes.

THE RESULTS: Simply delicious! I'm glad I added the lemon, it added a really nice tart accent to the sweet tomatoes. Even though I used fresh mozzarella, rather than the low-moisture kind, the sandwich didn't get too wet. The cheese melted quickly and beautifully and the slight saltiness was a nice complement to the other flavors. My toasty baguette delivered as expected, with a nice big crunch in each bite. All in all, I think Chef Ramsay would be proud (perhaps). :-)


> Get the final recipe!

Be featured on Panini Happy! Click here to find out how.

HUNGRY FOR MORE? YOU MIGHT ALSO ENJOY:

Monday, April 21, 2008

In Celebration of Grilled Cheese

Grilled Raclette Cheese & Honey Panini

As I previously announced, I've launched a new series called On Your Grill where I invite you toOn Your Grill submit your suggestions for panini and I'll choose a few each month to test out on Panini Happy. First up is a recommendation from Tiffany of Geneva, Switzerland (by way of Washington, DC!):


The best grilled cheese I've ever made is with raclette cheese on slices of french bread. To die for.

Quite a strong recommendation - sounds enticing! Thanks for the idea, Tiffany. I can't say I've ever had raclette cheese, but I'm always up for sampling new cheeses so I decided to give this idea a go. By the way, did you know that April is National Grilled Cheese Month? Seriously. Want to skip ahead? Click here for the final recipe.


"To Die For" Grilled Cheese Panini - Attempt #1

  • Bread: French
  • Meat: None
  • Cheese: Raclette
  • Condiments: None
  • "Goodies": None

THE PREPARATION: I decided to read up a little on raclette before I got started. Turns out it's a Swiss cheese - not the kind with the holes, but a semi-firm cow's milk cheese that's often used in fondue. Huh. Well, if it's good in fondue, then it's probably an excellent candidate for panini - sounds to me like a cheese that melts well. I had no trouble finding it at Bristol Farms in the specialty cheese section. And I was kind of pleased with myself to be bringing home something a little more interesting than cheddar for once (although I still love you, cheddar!).

THE CONSTRUCTION: I thought I'd make Tiffany's sandwich exactly as she described it for the initial attempt. Never having tasted raclette, I needed to get at least a baseline understanding of the flavors. This was, by far, the simplest sandwich I've made to date on this blog: brushed some melted butter on the outer sides of the bread, put a few slices of cheese in the middle and grilled on medium-high heat for a whopping 3 minutes.

THE RESULTS: Wow, that is delicious! The cheese melted beautifully, kind of stretchy like mozzarella. The flavor kind of reminded me of a really, really mild brie. I also detected a slight sweetness to it. The crisp, buttery French bread was a great accompaniment as its mildness really allowed the raclette to be the star. As good as this was, I thought I might be able to take things up one more little notch by tapping into that sweet flavor I tasted. I once had a pecorino and honey appetizer and I wondered whether honey might work here as well. On to Attempt #2!

Grilled Cheese & Honey Panini - Attempt #2

Okay, so this was the second-simplest sandwich I've made to date on this blog. I spread a little honey on the bread before adding the cheese this time.

THE RESULTS: Positively addictive! That touch of sweetness from the honey was a wonderful complement to the raclette. Incredibly simple, yet incredibly tasty. Thanks to Tiffany, this is now my favorite grilled cheese too!

Get the final recipe!

GET FEATURED ON PANINI HAPPY!
Do you have a great panini idea? Submit it today!

Friday, March 14, 2008

The Taste of Childhood


My sister ate peanut butter and jelly sandwiches virtually every single day from the time she was 5 years old until...well, just this week she told me she made one at her law office! I just read an interesting statistic on the Skippy website that said the average American child will eat 1,500 peanut butter sandwiches by the time he or she graduates from high school. Unbelievable! Growing up, I thought PB&J was okay but it wasn't a fave. I was more of a deli meats girl: bologna, salami and something our local delicatessen (my mom was the only mom who ever said "delicatessen"!) called "turkey roll". I even liked liverwurst in elementary school!

But anyway, back to PB&J. I think it was the texture - or lack thereof - of creamy peanut butter that kind of irked me. PB&J with creamy peanut butter is a mushy sandwich. And if you've read any of my earlier posts, you know that I have a real issue with mushiness. A lot of people love it this way, I'm just not one of them. And it's sticky! Remember that old "Got Milk" ad where the guy calls in for a radio trivia contest and he's got the winning answer, "Aaron Burr!!" but no one can understand him because he's just eaten a peanut butter sandwich without a glass of milk. It's problematic! SO, as I prepared to adapt PB&J into a panini version for the first installment of the Panini Happy Classics series I wanted to focus on utilizing the grill to improve the texture of this childhood classic. Want to skip ahead? Click here for the final recipe.

Peanut Butter & Jelly Panini - Attempt #
  • Bread: Seeded multigrain artisan bread
  • Meat: None
  • Cheese: None
  • Condiments: Chunky peanut butter, strawberry preserves
  • Goodies: Fresh strawberries

THE CONSTRUCTION: I have to preface this by saying I can't believe I'm about to discuss how I went about building a peanut butter and jelly sandwich! Man! Oh well...here goes. So as I mentioned, my goal for this panini-style PB&J was to give it some texture. I started with the bread. Wonder Bread and later whole wheat sandwich bread - once mom caught onto that - was de rigeur for PB&J as I remember it from the '80s. Both are too soft to press on the panini grill, so I turned to a thicker, heartier variety: a seeded multigrain loaf from my local market. Baked fresh hours earlier, it already had a seedy crunch without any grilling so it looked to be a great foundation for my texture-ful sandwich.

Next was the peanut butter itself. That was an easy one: go chunky. It turns out that most people (60%) prefer creamy over chunky, according to Skippy, and that East Coasters prefer creamy while West Coasters prefer chunky. Perhaps that explains my peanut butter disconnect, as a California kid living with New York parents! Anyway, Skippy Reduced-Fat Super Chunk it was.

Which leaves the J. It takes an otherwise mouth-cementing bite to a whole other sweet level. Strawberry has been my favorite as long as I can remember, as much for its bright sweetness as for its bold, bright color. Now, technically you'd have to call my sandwich a PB&P because I used strawberry preserves rather than jelly (I've read about the various distinctions, but it still has me confused). I thought it would be nice to add a layer of fresh strawberry slices for even more - you got it - texture. Plus, we're starting to get some nice strawberries in the grocery store.

To give the bread that nice crisp, toasty crust I like so much, I brushed a little melted butter on the outside of each slice. I flipped them over and began applying my fillings - Super Chunk peanut butter and strawberry slices (so pretty!) on one side and preserves on the other. I closed up the sandwich and grilled it on medium-high (375 degrees) for about 3-4 minutes until it was nicely toasted on the outside and the peanut butter had melted into a semi-gooey wonderfulness.

THE RESULTS: Where have you been all my life? If a PB&J like this had been placed in my lunchbox back in the day, I'd still be eating them all the time today like my sister. There was definitely no mushiness to be found - texture abounded. Crunch came not only from the peanuts but also the crispy grilled buttery bread and the seeds with dotted the crust. The hot, melted peanut butter was incredibly satisfying. And the fresh strawberries helped up the balance of fruit-to-peanut butter such that the sandwich on the whole wasn't too bread-y. A new way to enjoy PB&J and a great excuse to bring out the panini grill!


Get the final recipe!

Check out more from the Panini Happy Classics series:

Sunday, February 3, 2008

Eggplant to the rescue!


I decided to "go healthy" this time around. It didn't really dawn on me that I tend to gravitate toward the comfort end of the dining spectrum until my friend Karen let me know about her blog, Test Drive Kitchen in which she tests out healthy recipes. Now, I'm not apologetic for my apple turnover, calzone, egg biscuit or Buffalo chicken...but I suppose it wouldn't be so bad for me to balance all that comfy stuff with a healthy option every now and then! Yes, I have food guilt. Especially knowing the decadent panini recipe I've got coming up for Valentine's Day, I figured now would be as good a time as any to go for something lighter :-)

Want to skip ahead? Click here for the final recipe!

NOTE: Due to a camera memory card malfunction, most of the photos I took this time around converted to "corrupted data", so said the LCD screen. I will do my best to verbally depict!

Roasted Eggplant & Red Pepper Grilled Cheese Panini - Attempt #1

  • Bread: Baguette
  • Condiment: Marinara on the side
  • "Meat": Eggplant, Red bell peppers
  • Cheese: Fresh mozzarella, Italian cheese blend
  • "Goodies": None
THE INSPIRATION: I should admit that I didn't set out to do a grilled cheese recipe per se. I did look to try something healthier and to incorporate roasted eggplant, a vegetable I've come to love in recent years. Eggplant parmesan was actually my original inspiration for this sandwich - a sandwich with wonderful eggplant and cheese and sauce. For better or for worse, as you'll see, the translation from a main dish to a sandwich isn't an easy one. Sometimes you just have to let the ingredients speak to you - this day, they told me they wanted to become a lighter grilled cheese!

THE PREPARATION: I started by slicing 2 Japanese eggplants lengthwise into 1/2" slices. I had originally planned to use the big eggplants we typically use for eggplant parmesan, but it occurred to me in the supermarket that the smaller, narrower Japanese variety would fit a little better on the bread. I lay the slices on a rimmed baking sheet, brushed 2 tablespoons of olive oil on them, seasoned them with sea salt and freshly ground black pepper and put the baking sheet under the broiler for about 5 minutes. I came a little close to burning them (doh!) so I think 4-5 minutes would probably have been better. I took one for a little taster - nice!

I had originally intended to try this on ciabatta but, once again, the grocery store didn't carry it (Vons, if you're listening, please start stocking ciabatta bread!!). So I went with a french baguette instead, which I found out can be a touch more roly-poly on the panini grill than is ideal. More on that later. I cut the baguette into 4-5" pieces and sliced each piece lengthwise to create top and bottom halves.

THE CONSTRUCTION: I began to layer the roasted eggplant slices with cheese and marinara a la parmesan:
  • a tablespoon of marinara
  • a tablespoon of Italian blend shredded cheese
  • a slice of eggplant
  • another tablespoon of marinara
  • 2 pieces of fresh mozzarella (enough to fit the length of the bread)
  • another tablespoon of marinara
  • a slice of eggplant
  • another tablespoon of shredded cheese
  • a final tablespoon of marinara
Looking at the list now, I should have had a clue that all that marinara probably would not fare too well! But sometimes you just have to try.

I put the sandwich on the panini grill toward the back on low heat and, wouldn't you know, all the contents slid out immediately! Lesson learned: exercise caution when dealing with tubular-shaped bread and a high-profile sandwich. With the help of a spatula I managed to shove everything back in place and this time moved the sandwich toward the front of the grill. There was much less forward-pushing action this time.

THE RESULTS: Not great. All the marinara really made the bread soggy, which isn't too appetizing. Obviously, the slippage that occurred when grilling the sandwich was a problem as well. Not only would it have been better to grill the sandwiches toward the back of the panini grill, it also might be better to use a higher grill height (again, to minimize the impact to the sandwich contents). All I really needed was to toast the bread and melt the cheese so grilling "low and slow" wasn't really necessary - it could have gone on higher heat.

Roasted Eggplant & Red Pepper Grilled Cheese Panini - Attempt #2

For Attempt #2, I cut back on the marinara, adding it only on top of each eggplant slice and not directly onto the bread. I raised the heat on the grill to 350 degrees to try to melt the cheese faster and get more of a toast on the bread. Finally, I flattened the sandwich with my hand first to minimize the chance of everything sliding out.

THE RESULTS: Still not quite what I'd hoped for. Flattening the sandwich prior to grilling definitely improved the slide factor - it stayed pretty intact for the most part this time. Even though I didn't apply the marinara directly to the bread, it still made its way on there and became soggy. It also just plain didn't look that good. I needed to turn this thing around!

Roasted Eggplant & Red Pepper Grilled Cheese Panini - Attempt #3

All right, we were gonna get a good sandwich here! I abandoned the marinara altogether - no soggy bread on my watch! But I still wanted to see something red and flavorful between the bread. I pulled out my jar of roasted red bell peppers (leftover from my Inaugural Experiment) and cut a piece to fit the sandwich. So now I had just cheese and vegetables on the sandwich - no condiments. Perhaps this sandwich wanted to be a grilled cheese after all! By using the eggplant and red pepper I was able to cut out some of the cheese yet still have great flavor. A healthy alternative for those of us still honoring our New Year's resolutions to eat better.

THE RESULTS: Aha! This one was good. No soggy bread - hurray! It was warm and crispy and cheesy just like a good grilled cheese should be. Now, I do still love my marinara. My husband thought of the perfect solution - marinara for dipping on the side! That way the sandwich can still benefit from that zesty kick (just like the classic grilled cheese and tomato soup combo) without having the sauce spend a long time seeping into the bread and getting soggy.

Click here for the final recipe!

Friday, January 25, 2008

Yes, More Puff Pastry - Spinach & Ricotta


I promise not all of these recipes will involve puff pastry! Since I had a sheet of puff pastry left over from the Apple Turnover Panini effort, I thought I'd try one more variation - a savory, calzone type. Now that I know that puff pastry will work on the panini grill, I decided to play more with the flavors this time around. Want to skip ahead? Click here for the final recipe.

Spinach Ricotta Panini - Attempt #1

  • Bread: Puff pastry

  • Condiment: None

  • Cheese: Ricotta

  • Meat: Prosciutto

  • "Goodies": Spinach

THE INSPIRATION: Calzones - good calzones. Growing up, I never even heard of calzones until my sophomore year of high school when my family moved to Connecticut. The school cafeteria served these huge lard-laden (it seemed!) golden mounds of crust stuffed with ricotta cheese alongside the fries as a daily option. It was labeled a "calzone." When I finally mustered up the courage to give it a try, my fears were confirmed - it was nasty. Even my 15-year-old sense of nutrition knew I shouldn't put something like that in my body! However, I strongly suspected that not all calzones were as uninspired as those in the caf. Fortunately, I did not give up on them and have since discovered that "real" calzones - with balanced flavors and textures - are terrific. And so, in the name of "good calzones", I attempt a calzone panini!


THE PREPARATION: I thawed a 10-oz package of frozen chopped spinach in the microwave (finally figured out how to use those automatic features!), then drained it in a colander and squeezed out as much water as I could.I transferred the spinach to a medium bowl and combined it with a 15-oz package of part-skim ricotta cheese, a pinch of nutmeg, 1/2 teaspoon of garlic powder and 1/2 teaspoon of dried oregano leaves. I transferred half of the mixture to another bowl so I could test different flavors in Attempt #2.


Continuing Attempt #1 with half of the original mixture, I added 1/4 teaspoon of sea salt.


THE CONSTRUCTION: I floured my thin cutting board, rolled my thawed puff pastry out to a 12" x 12" square and divided it into 4-6" x 6" squares. Then I lay a slice of prosciutto (left over from "Chicken, Prosciutto & Asiago - Attempt #1) diagonally across one of the squares. I spooned 3 tablespoons of the spinach mixture on top of the prosciutto, in the center of the square, and rolled the ends of the prosciutto around the spinach mixture.


Next, I dipped a finger in water, wet the edges of the pastry and folded the pastry in half over the prosciutto and spinach mixture, forming a triangle. I folded up the edges to seal.


Then the panino went on the panini press - I lowered the top grate to the 3rd position above "low" to make good contact with the pastry without flattening it. Grilled for 12 minutes, topped with some jarred marinara from Dean & DeLuca.


THE RESULTS: Okay, but not great. The prosciutto was just too overpowering - we (my husband and I) couldn't taste the spinach at all. It just tasted salty. Also, the pastry came out a little too light, not flaky enough - most likely because the press height was too high. No worries, that's why we experiment!


Spinach Ricotta Panini - Attempt #2


Prosciutto was out. Now the objective was to enhance flavor by some other means, ensuring to preserve the spinach-iness. I decided to add 1/4 cup of shredded parmesan cheese to the other half of my original spinach mixture for better flavor and to get more of that stretchy-cheese texture. I didn't add any salt this time since I thought the parmesan might contain enough.

I also brought the height of the panini press down to the 2nd-from-the bottom setting for better grill coverage.

THE RESULTS: Better! Not surprisingly, the panino came out a touch thinner this time, due to the lower press height. But the pastry was cooked more thoroughly and evenly. The taste was definitely improved, we could taste the spinach and it wasn't too salty. On the contrary, the pendulum may have swung a little too far to the other side - it wasn't quite flavorful enough! Then I remembered my "silver bullet" from the Chicken, Prosciutto and Asiago trial - pesto spread.

Spinach Ricotta Panini - Attempt #3

I stuck with the spinach mixture that contained the parmesan but this time I spread a layer of pesto spread on the uncooked puff pastry before adding the spinach mixture. The hope was that the basil and garlic flavors would be just the right addition to punch up this panino without overpowering it.

THE RESULTS: Eureka! The pesto did the trick. The spinach was enhanced by the basil and garlic flavors, the pastry was flaky, the ricotta and parmesan held everything together and tasted great.


Click here for the final recipe!