Showing posts with label dessert panini. Show all posts

Friday, April 11, 2008

Yup, I Grilled Cookies!

One dollar and fifty cents doesn't buy much anymore these days, but in the Westwood neighborhood of Los Angeles, just off-campus from UCLA, a buck-fitty will get you a most wonderfully decadent classic treat: a scoop of ice cream sandwiched between two freshly-baked cookies at a place called Diddy Riese. The perpetual line out the door is tell-tale. There's either something really good or something really cheap - in this case it's both. It's the original dessert sandwich, and I'm making a panini version to file in my Panini Happy Classics vault. Want to skip ahead? Click here for the final recipe.

Cookies & Ice Cream Panini - Attempt #1

  • Bread: Chocolate chip cookies
  • Meat: None...unless ice cream counts as protein!
  • Cheese: None
  • Condiments: None
  • "Goodies": Rainbow sprinkles

THE INSPIRATION: My sister, Julie, and I had our first opportunity to bake chocolate chip cookies on our own during a summer school cooking class - I was 12 and she was 9. We were supposed to bake 2 dozen cookies at our little kitchen station. Having observed our mother bake countless batches at home (Mom attempted to crack the Mrs. Fields recipe!), we decided to switch things up a little and make 6 ENORMOUS cookies instead. We piled 6 massive mounds of dough onto our cookie sheets and loaded them into the oven, with cheshire grins on our
faces. It'll come as no surprise that we wound up with 6 enormous MESSES, with burnt edges and raw centers. To this day, I still don't understand why the teacher got so mad at us - we may not have yielded any cookies but we learned a lasting lesson about adjusting the oven temperature!

THE PREPARATION: I'll admit I embarked on this one on a whim. I hoped it would be feasible to grill cookies, but I wasn't willing to risk the time it would take to mix up a whole batch of cookie dough from scratch on this chance this descended into a disaster. So I cheated and bought a tub of the store-bought refrigerated dough - a brand called Tom's, which I'd never heard of before, that was re-sealable so I could just make a few at a time.

I heated up the grill to about 325 degrees, as instructed by Tom's, and put four of the cold little discs onto the grates - left a lot of space in between, not knowing if these would spread out like pancakes. I closed the lid, pressing down until the top grates appeared to be making contact with the tops of the cookies. I didn't want to press them too hard, but I did want to get the heat to distribute as evenly as possible.

The package said to bake the cookies for 15-16 minutes, these guys were done after about 8 minutes. When I lifted up the lid, my initial impression of the way the cookies looked wasn't great. I'd hoped to see evenly grilled little rounds, but (I surmised) due to the way that cookies spread from the center out, the centers were taller and therefore only the centers received direct grill contact. However, I did not dispair! I flipped the cookies over and there was the golden, evenly grilled look I was hoping for. This panini world is an unpredictable one at times - a world where bottoms can turn into tops!

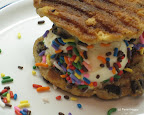
THE CONSTRUCTION: I wanted to get the ice cream inside ASAP while the cookies were still warm. I cracked open a brand new container of Dreyer's Slow-Churned vanilla, scooped out a couple of small scoops, and pressed down gently so as not to break the cookies. As a final step, I thought I'd add a little confectionary pizzazz - rainbow sprinkles! All of a sudden, I felt like an 8-year-old kid having just been handed a big cone at Baskin-Robbins, all anxious to dive in. And so I did.

THE RESULTS: Oh yeah! Nothing beats warm cookies and ice cream - the folks at Diddy Riese are geniuses. And it was so quick and easy. I don't feel one iota of guilt over not having made my own cookie dough. The less time I spend prepping these sandwiches, the more time I have to eat them! Oh, and...uh...share them too :-)

Get the final recipe!

> More Panini Happy Classics:

Thursday, February 7, 2008

Chocolate + Raspberries = Valentine's Day!


Is there anything better than chocolate to create a romantic mood with food on Valentine's Day? I wanted to come up with a chocolate panini recipe that truly was a proper dessert - not just chocolate between two pieces of bread. It wasn't easy - a chocolate sandwich is the kind of thing you dream about as a kid (along with Cookie Crisp cereal - whose mom let them eat that?!) but most of us rarely, if ever, actually make. Except if maybe you count a Nutella sandwich. Those are good, but you can hardly call it a special occasion romantic dessert. No, I was looking to make something decadent, a little bit refined, but still relatively easy to prepare. I think my Chocolate Raspberry Croissant Panini fits the bill! Want to skip ahead? Click here for the final recipe.

Chocolate Raspberry Croissant Panini...for Two! - Attempt #1

  • Bread: Croissant
  • Condiment: Raspberry preserves
  • "Meat": Semi-sweet chocolate
  • Cheese: None
  • Goodies: Crème anglaise
THE INSPIRATION: Valentine's Day was, for sure, the impetus for my thoughts on a chocolate panini recipe. Now that we're new parents of a 2-month old, my husband and I will be dining in on Valentine's Day this year. Nonetheless, I still want to at least make a special dessert for the two of us. Since my husband enjoys croissants (and raisin bread and cinnamon rolls and bagels and pretty much any kind of bread or pastry you can name!) I thought they would be a great choice for the bread in my sandwich. The idea for raspberries also came from him - which actually came as a bit of a surprise, in that he usually doesn't care for fruit with chocolate. But I totally agreed with him that raspberries and chocolate is a great pairing - plus, raspberries kind of look like little hearts, don't they? Finally, the idea for crème anglaise came from the many pastry desserts I've had over the years that incorporated it - yum! That would be the homemade part of this "semi-homemade" dessert - I think Sandra Lee of the Food Network would be proud!

THE PREPARATION: I started with the crème anglaise. If you're not familiar with creme anglaise, it's a thin dessert custard sauce made with sugar, egg yolks, cream and vanilla. It's fantastic and although it took a little extra time to make, I knew it would be worth it. I did a little online research to find out the basic proportions and made a few adjustments based on the rich, sweet taste I was going for.

In a medium bowl, I whisked together 3 egg yolks with 1/4 cup of sugar and set it aside. Then I heated 1/2 cup of whole milk, 1/2 cup of heavy cream and good vanilla (as my favorite Barefoot Contessa, Ina Garten, would say!) over medium heat in a heavy saucepan, stirring constantly until the milk began to simmer. Then I gradually stirred the milk into the egg mixture - I "tempered" the eggs by pouring just a little of the milk in first to raise the temperature (I could hear Ina say, "You don't want scrambled eggs!".

I cleaned my original saucepan, scraping off the inevitable cooked-on bits, and transferred the now-custard back in. I heated the custard over low heat, stirring constantly with a wooden spoon to try and keep the custard from cooking onto the pot. I took it off the heat once it was slightly thickened and I could draw a line on the back of a spoon (I watched Bobby Flay do this on "Iron Chef" the other night - Alton Brown mentioned this was called napé). Then I strained the custard into a small bowl and let it cool for about 10 minutes.

THE CONSTRUCTION: While the crème anglaise cooled, I got started on preparing the actual sandwich. I cut an opening along the inside of the croissant to create a little pocket to hold the chocolate and raspberry preserves. I spread 2 teaspoons of the preserves within the pocket and then lay about an ounce of semi-sweet Ghirardelli chocolate on top of the preserves (as a Bay Area native, my heart belongs to Ghirardelli...Scharffen Berger would have been great as well!).
With the panini grill at medium height, I grilled the croissant at 350 degrees for 10 minutes until the chocolate had melted.

While the croissant was grilling, I melted more chocolate to drizzle later as a garnish. This time, I used Ghirardelli semi-sweet chocolate chips, melting 1/2 cup of them in the microwave.

I gave a lot of thought to how I wanted this chocolate sandwich to look on the plate - after much deliberation I decided I wanted to see a drizzle of chocolate on the croissant but not on the plate. So once the croissant was done grilling, I transferred it to a piece of parchment paper and did my drizzle on the parchment. Over on the dessert plate, I spooned 3 tablespoons of my crème anglaise to create a little pool in the middle (alas, there was quite a bit of extra crème anglaise, but oh well - it's not like you can just make 3 tablespoons of it!). Then I centered the chocolate-drizzled croissant amidst the vanilla pool. Finally, I picked out a particularly luscious raspberry from the bunch and placed it where the two ends of the croissant met.

THE RESULTS: A winner right out of the gate! It turned out just as I'd hoped: grilling on the panini press made an already-flaky croissant extra crispy on the outside, while heating the gooey chocolate-raspberry center. The raspberry preserves were an excellent complement to the chocolate (great suggestion, dear husband!) and the crème anglaise provided the rich vanilla flavor and smooth texture that finished off the dessert panino perfectly. I'm definitely calling this a "dessert for two" as it's probably too rich to be served as an individual serving. It's just as well...it is, after all, designed for Valentine's Day!

Click here for the final recipe!


Looking for more great Valentine's Day recipes? Check these out from my fellow food bloggers:

Saturday, January 19, 2008

Apple Turnover Panini - It Worked!

It worked!

It's not only possible to make an apple turnover on a panini press, it's actually quick and easy and in some ways comes out better than if you'd baked it in the oven. Putting the puff pastry directly on the grates ensures crispiness on the outside as well as creates ridges that cradle the caramel sauce. I made two attempts - one where I carmelized the apples and one where I didn't.

Apple Turnover Panini - Attempt #1


  • Bread: Puff Pastry

  • Condiment: Caramel, essentially - sugar, cinnamon, nutmeg & butter

  • Cheese: None

  • Meat: None

  • "Goodies": Fuji apples

THE INSPIRATION: Apple turnovers!

THE PREPARATION: I thawed one sheet of the puff pastry (I used Pepperidge Farm) for 40 minutes at room temperature and then kept it cold in the refrigerator until I needed it. Then I got to work on the apples.
I knew it was important to keep the apples from browning once I'd sliced them and I'd normally use lemon to achieve this...of course, I'd forgotten to buy any lemons! So I went with orange juice instead, which I later discovered was probably a better move anyway. I poured 1-1/2 cups of OJ into a medium bowl, ready to receive apple slices. I love Fuji apples so I peeled, cored and sliced (1/8" thick) two of them and deposited them into the OJ bowl as I went. Seemed like just about the right amount of juice to apples - enough to cover, not a lot of excess.

Then, in a gallon-sized ziploc plastic bag I combined 2 tablespoons of granulated sugar, 1/4 tsp of cinnamon and a pinch of nutmeg. I drained the apples (without rinsing), poured them into the bag, sealed the bag and shook to coat.


In a saute pan, I melted 1 tablespoon of butter over medium-high heat. I added half of the apple mixture (retained the other half for the "raw test"), sauteed the apples for about 6 minutes until them they were caramelized and set them aside.


Time to heat up the panini press - I set it to 400 degrees.

THE CONSTRUCTION: I rolled the sheet of puff pastry out to a 12" x 12" square on a floured surface (a thin cutting board). I then divided the pastry into 4-6" x 6" squares. I spooned some of the carmelized apple slices into the center of two of the squares - I kind of eyeballed it to make sure there was a good amount of apples in each, but not overfilled. I also tried to lay the apples out evenly to create a somewhat flat surface, rather than piling them. I thought this might be important when it came time to press. I dipped my finger in water, wet the edges of the pastry and folded it over to form a triangle. I folded the edges over and pressed to seal.


Finally, the moment of truth. I placed the pastry on the lower grate of the press and lowered it to the 2nd-from-the-bottom height (the Breville Ikon press allows you to adjust the height; other models may as well). Juices started bubbling out after about 2 minutes - I grabbed the drip tray attachment immediately. The press may be non-stick, but my countertops are not! While initially only the tallest areas of the turnover panino were touching the upper grate, by 7 minutes the rest of the pastry had puffed to touch as well. I grilled the turnover for a total of 10 minutes.


THE RESULTS: Excellent! I was so pleased to see that puff pastry can be grilled on a panini press! But how would it taste? I decided to plate the apple turnover panini with a scoop of vanilla ice cream and a drizzle of chocolate sauce. My husband suggested a slice of strawberry would be a nice garnish as well (unfortunately we didn't have any).

The apples had good bite - not too soft or too hard. Also, the cooked-on caramel easily wiped off of the press grates (I'd been fearing the clean-up!).

I did feel the recipe could be improved, though: I didn't love the chocolate sauce. Perhaps it would have been better if I'd actually made a fudge sauce rather than resorting to the Hershey's. I felt caramel would probably be a better accompaniment to the apples and cinnamon.

Which lead me to...

Apple Turnover Panini - Attempt #2

Same ingredients and preparation as in Attempt #1, except this time I decided to bypass the apple carmelization step. I also let the turnover stay on the press for 2 minutes longer for the pastry to get more golden and flakier.


THE RESULTS: Even better! Without the carmelization of the apples, I could actually taste the orange juice on the apples, which was nice added flavor. Also, the caramel sauce complemented the apples and cinnamon flavors much better than the chocolate sauce did. We have a winner!

Check out the winning recipe!