Tuesday, January 29, 2008

Super Bowl Panini - Buffalo Chicken!

With the Super Bowl coming up this weekend, I wanted to come up with a panini recipe that would be perfect for watching the big game (or the commercials, for some of us). Buffalo chicken jumped immediately to mind as "game food" that is not only super-flavorful but also might translate well into a grilled sandwich. Want to skip ahead? Click here for the final recipe.


Super Bowl Buffalo Chicken Panini - Attempt #1

  • Bread: Pita
  • Condiment: Buffalo chicken sauce
  • Meat: Chicken thighs
  • Cheese: Blue cheese
  • "Goodies": Caramelized red onions

THE INSPIRATION: Buffalo wings! If you're not familiar with them, they're named after Buffalo, New York where they originated. According to Wikipedia, chicken wings are traditionally deep fried and then coated in a spicy sauce comprised of cayenne pepper hot sauce and butter or margarine. They're typically served with celery and carrot sticks and blue cheese dressing. For my Super Bowl Buffalo Chicken Panini, I kept the chicken, sauce and blue cheese and added caramelized red onions for sweetness and pita bread for a toasty "envelope" to hold everything together.

THE PREPARATION: To ensure tender chicken for the sandwich, I decided to go with dark meat - chicken thighs. I sliced 1-1/2 lbs. of thighs into 1/2" strips. Next, I wanted to simmer the strips in Buffalo chicken sauce. I had originally planned to make my own sauce, but when I saw so many bottled Buffalo chicken sauces in the grocery store I thought, what the heck. I went with the Frank's Red Hot Buffalo Wing sauce which, according to the bottle and Wikipedia, contains the original hot sauce from Buffalo. So I put the chicken and sauce in a large saute pan over medium-high heat, brought it to a boil and then covered and simmered for 15 minutes. I tested a few pieces and they seemed done enough - the cayenne flavor was fantastic!


While my chicken was simmering, I got to work on caramelizing my red onions. I sliced 1 large red onion into thin rings and sauteed them with 2 tablespoons of butter over medium heat for what wound up being about 13 minutes. I stirred in 2 teaspoons of sugar to help with the caramelization and sauteed the onions for another 10 minutes at which point they were soft and brown.

THE CONSTRUCTION: When it came time to assemble the panini, an issue immediately arose - the pita breads were not very flexible. First of all, the only pita I could find in my grocery store were the perforated kind, which did not help things. Naturally, when I folded a pita along the perforation it separated (what it was designed to do!). When I tried folding another pita in the other direction it still broke. So I tried the old tortilla trick of microwaving a 3rd pita for 10 seconds and that did seem to make the bread a bit more malleable. Not malleable enough as this one did break a little as well! Oh well, I decided to go ahead and continue with constructing the sandwich.

On one half of the slightly broken pita I layered some of the caramelized red onions, then the chicken (I used a slotted spoon to drain most of the excess sauce, allowing just a little onto the sandwich), and lastly a few tablespoons of blue cheese. I carefully folded the pita over, transferred the sandwich to the panini press and grilled it at a medium-high grill height at 350 degrees for 5 minutes.

THE RESULTS: It wasn't much to look at, due to the broken pita, but the taste and texture was terrific. And I'm not even a huge blue cheese fan. The pita bread toasted extremely well and came out nice and crispy. The filling, with the melted blue cheese and Buffalo chicken sauce, was a little bit messy - but hey, it's Buffalo chicken! The caramelized onions added just the right amount of sweetness to balance the tangy-ness of the hot sauce and creamy pungency of the blue cheese. If only I could get the pita to stay intact.

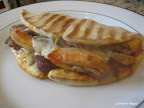
Super Bowl Buffalo Chicken Panini - Attempt #2

On a whim I decided to give the microwaving trick another try, this time increasing the cook time to 15 seconds - it worked! The pita came out nice and malleable, but I could tell I only had a short window of time before it cooled down and became stiff again. So I quickly assembled the sandwich and got it on the panini grill.

THE RESULTS: Yes! It had all the characteristics I was going for - tender, flavorful chicken, a good melt on the blue cheese, onions to balance it all out. That was one good sandwich.

Click here for the final recipe!

Looking for more great Super Bowl recipes? Check out the roundup at Simply Recipes!

Sunday, January 27, 2008

Eggs and Cheese and Bacon - Oh My!


Don't tell your cardiologist!

Egg...cheese...bacon...biscuits...your arteries may not thank you, but your mouth sure will! In a continued effort to explore the different types of breads a panini grill can support, I decided to venture into refrigerated dough. Want to skip ahead? Click here for the final recipe.

Egg, Cheese & Bacon Biscuit Panini - Attempt #1


  • Bread: Biscuits

  • Condiment: None

  • Cheese: Cheddar

  • Meat: Omelet, Bacon

  • "Goodies": None

THE INSPIRATION: Some of my fondest memories of growing up took place on our annual weeklong summer family vacations. They weren't extravagant by any means - mostly road trips, visits to amusement parks, renting a house by the lake and the like. One hallmark of these vacations was fast food breakfast - we never ate it at any other time of the year but during our vacations we had it almost every day! Now, with my oh-so-refined palette I know that these meals should have been nothing to write home (or blog) about. But now they've taken on a highly nostalgic meaning to me. My favorite: the Bacon, Egg & Cheese Biscuit at McDonald's - a savory, gratifying concoction that just made you feel good. When contemplating options for a breakfast panini sandwich recipe, my mind turned immediately to this childhood fave.


THE PREPARATION: I know that panini sandwiches generally ought to require relatively little prep and that the easiest form in which to present the eggs would be to scramble them...but I was somewhat reluctant to have loose pieces of egg. So I decided to do an omelet instead. I whisked 6 eggs with 1/2 teaspoon of sea salt, 1 teaspoon of dried basil, 2 tablespoons of milk and 1/4 teaspoon of black pepper. When I looked at the mixture, I was a little concerned over the volume of basil - there was a whole lot of green floating in there! Oh well, it's an experiment.


I sprayed an 8" saute pan with cooking spray, poured in the eggs and cooked them over medium heat for 8 minutes. The bottom was well cooked, but the top was still pretty runny so I finished it off in the oven at 400 degrees for another 5 minutes. When it came out, I had a 1/2"-thick little basil frittata. I inverted it onto a cutting board and divided it into four pieces.


THE CONSTRUCTION: With the eggs prepared, it was time to build the sandwich; I turned on the panini grill to 350 degrees. I wanted to see whether it would be possible to simultaneously bake the biscuits and grill the sandwich on the panini grill. So I took an uncooked biscuit off of the roll of refrigerated dough and cut it in half lengthwise with a pair of scissors to create top and bottom halves and lay them on a piece of parchment paper. Starting from the bottom, I layered the bottom biscuit half, a piece of the omelet, ready-cooked bacon (one trip ripped into two halves), a slice of mild cheddar cheese and the top biscuit half.


THE RESULTS: I could tell this wasn't going to work before I even got the sandwich to the grill! The hot omelet had begun to melt the bottom biscuit half from the moment the two made contact - by the time I'd finished assembling the sandwich and lifted it up the bottom biscuit was a stretchy mess. Nevertheless, I went ahead and put it on the panini grill, in the 4th height position - may as well see it through! The cheddar melted after about a minute, but the biscuit was obviously not even close to done. The first Panini Happy failure :-)


Egg, Cheese & Bacon Biscuit Panini - Attempt #2


For Attempt #2, I decided to start with biscuits that were already baked. I also lowered the height to the 3rd position.


THE RESULTS: Terrific! The grilled biscuit got a nice crispy, toasted exterior while remaining soft inside. I had previously been concerned about how much basil was in the eggs, but I had no reason to worry - it gave great flavor while not being overpowering. The cheddar melted well and the bacon's salty-sweet flavor was a wonderful complement. If only the biscuit hadn't gotten so smashed - the bread had gotten bit thinner than I'd have liked, due to the pressing. So I decided to go for one more Attempt.


Egg, Cheese & Bacon Biscuit Panini - Attempt #3


Attempt #3 was nearly the same as Attempt #2, except I raised the height of the panini grill back to the 4th position.


THE RESULTS: Winner! With the higher grill height, the biscuit got crispy without getting too smashed down. Balance achieved!


Click here for the final recipe!

Friday, January 25, 2008

Yes, More Puff Pastry - Spinach & Ricotta


I promise not all of these recipes will involve puff pastry! Since I had a sheet of puff pastry left over from the Apple Turnover Panini effort, I thought I'd try one more variation - a savory, calzone type. Now that I know that puff pastry will work on the panini grill, I decided to play more with the flavors this time around. Want to skip ahead? Click here for the final recipe.

Spinach Ricotta Panini - Attempt #1

  • Bread: Puff pastry

  • Condiment: None

  • Cheese: Ricotta

  • Meat: Prosciutto

  • "Goodies": Spinach

THE INSPIRATION: Calzones - good calzones. Growing up, I never even heard of calzones until my sophomore year of high school when my family moved to Connecticut. The school cafeteria served these huge lard-laden (it seemed!) golden mounds of crust stuffed with ricotta cheese alongside the fries as a daily option. It was labeled a "calzone." When I finally mustered up the courage to give it a try, my fears were confirmed - it was nasty. Even my 15-year-old sense of nutrition knew I shouldn't put something like that in my body! However, I strongly suspected that not all calzones were as uninspired as those in the caf. Fortunately, I did not give up on them and have since discovered that "real" calzones - with balanced flavors and textures - are terrific. And so, in the name of "good calzones", I attempt a calzone panini!


THE PREPARATION: I thawed a 10-oz package of frozen chopped spinach in the microwave (finally figured out how to use those automatic features!), then drained it in a colander and squeezed out as much water as I could.I transferred the spinach to a medium bowl and combined it with a 15-oz package of part-skim ricotta cheese, a pinch of nutmeg, 1/2 teaspoon of garlic powder and 1/2 teaspoon of dried oregano leaves. I transferred half of the mixture to another bowl so I could test different flavors in Attempt #2.


Continuing Attempt #1 with half of the original mixture, I added 1/4 teaspoon of sea salt.


THE CONSTRUCTION: I floured my thin cutting board, rolled my thawed puff pastry out to a 12" x 12" square and divided it into 4-6" x 6" squares. Then I lay a slice of prosciutto (left over from "Chicken, Prosciutto & Asiago - Attempt #1) diagonally across one of the squares. I spooned 3 tablespoons of the spinach mixture on top of the prosciutto, in the center of the square, and rolled the ends of the prosciutto around the spinach mixture.


Next, I dipped a finger in water, wet the edges of the pastry and folded the pastry in half over the prosciutto and spinach mixture, forming a triangle. I folded up the edges to seal.


Then the panino went on the panini press - I lowered the top grate to the 3rd position above "low" to make good contact with the pastry without flattening it. Grilled for 12 minutes, topped with some jarred marinara from Dean & DeLuca.


THE RESULTS: Okay, but not great. The prosciutto was just too overpowering - we (my husband and I) couldn't taste the spinach at all. It just tasted salty. Also, the pastry came out a little too light, not flaky enough - most likely because the press height was too high. No worries, that's why we experiment!


Spinach Ricotta Panini - Attempt #2


Prosciutto was out. Now the objective was to enhance flavor by some other means, ensuring to preserve the spinach-iness. I decided to add 1/4 cup of shredded parmesan cheese to the other half of my original spinach mixture for better flavor and to get more of that stretchy-cheese texture. I didn't add any salt this time since I thought the parmesan might contain enough.

I also brought the height of the panini press down to the 2nd-from-the bottom setting for better grill coverage.

THE RESULTS: Better! Not surprisingly, the panino came out a touch thinner this time, due to the lower press height. But the pastry was cooked more thoroughly and evenly. The taste was definitely improved, we could taste the spinach and it wasn't too salty. On the contrary, the pendulum may have swung a little too far to the other side - it wasn't quite flavorful enough! Then I remembered my "silver bullet" from the Chicken, Prosciutto and Asiago trial - pesto spread.

Spinach Ricotta Panini - Attempt #3

I stuck with the spinach mixture that contained the parmesan but this time I spread a layer of pesto spread on the uncooked puff pastry before adding the spinach mixture. The hope was that the basil and garlic flavors would be just the right addition to punch up this panino without overpowering it.

THE RESULTS: Eureka! The pesto did the trick. The spinach was enhanced by the basil and garlic flavors, the pastry was flaky, the ricotta and parmesan held everything together and tasted great.


Click here for the final recipe!

Saturday, January 19, 2008

Apple Turnover Panini - It Worked!

It worked!

It's not only possible to make an apple turnover on a panini press, it's actually quick and easy and in some ways comes out better than if you'd baked it in the oven. Putting the puff pastry directly on the grates ensures crispiness on the outside as well as creates ridges that cradle the caramel sauce. I made two attempts - one where I carmelized the apples and one where I didn't.

Apple Turnover Panini - Attempt #1


  • Bread: Puff Pastry

  • Condiment: Caramel, essentially - sugar, cinnamon, nutmeg & butter

  • Cheese: None

  • Meat: None

  • "Goodies": Fuji apples

THE INSPIRATION: Apple turnovers!

THE PREPARATION: I thawed one sheet of the puff pastry (I used Pepperidge Farm) for 40 minutes at room temperature and then kept it cold in the refrigerator until I needed it. Then I got to work on the apples.
I knew it was important to keep the apples from browning once I'd sliced them and I'd normally use lemon to achieve this...of course, I'd forgotten to buy any lemons! So I went with orange juice instead, which I later discovered was probably a better move anyway. I poured 1-1/2 cups of OJ into a medium bowl, ready to receive apple slices. I love Fuji apples so I peeled, cored and sliced (1/8" thick) two of them and deposited them into the OJ bowl as I went. Seemed like just about the right amount of juice to apples - enough to cover, not a lot of excess.

Then, in a gallon-sized ziploc plastic bag I combined 2 tablespoons of granulated sugar, 1/4 tsp of cinnamon and a pinch of nutmeg. I drained the apples (without rinsing), poured them into the bag, sealed the bag and shook to coat.


In a saute pan, I melted 1 tablespoon of butter over medium-high heat. I added half of the apple mixture (retained the other half for the "raw test"), sauteed the apples for about 6 minutes until them they were caramelized and set them aside.


Time to heat up the panini press - I set it to 400 degrees.

THE CONSTRUCTION: I rolled the sheet of puff pastry out to a 12" x 12" square on a floured surface (a thin cutting board). I then divided the pastry into 4-6" x 6" squares. I spooned some of the carmelized apple slices into the center of two of the squares - I kind of eyeballed it to make sure there was a good amount of apples in each, but not overfilled. I also tried to lay the apples out evenly to create a somewhat flat surface, rather than piling them. I thought this might be important when it came time to press. I dipped my finger in water, wet the edges of the pastry and folded it over to form a triangle. I folded the edges over and pressed to seal.


Finally, the moment of truth. I placed the pastry on the lower grate of the press and lowered it to the 2nd-from-the-bottom height (the Breville Ikon press allows you to adjust the height; other models may as well). Juices started bubbling out after about 2 minutes - I grabbed the drip tray attachment immediately. The press may be non-stick, but my countertops are not! While initially only the tallest areas of the turnover panino were touching the upper grate, by 7 minutes the rest of the pastry had puffed to touch as well. I grilled the turnover for a total of 10 minutes.


THE RESULTS: Excellent! I was so pleased to see that puff pastry can be grilled on a panini press! But how would it taste? I decided to plate the apple turnover panini with a scoop of vanilla ice cream and a drizzle of chocolate sauce. My husband suggested a slice of strawberry would be a nice garnish as well (unfortunately we didn't have any).

The apples had good bite - not too soft or too hard. Also, the cooked-on caramel easily wiped off of the press grates (I'd been fearing the clean-up!).

I did feel the recipe could be improved, though: I didn't love the chocolate sauce. Perhaps it would have been better if I'd actually made a fudge sauce rather than resorting to the Hershey's. I felt caramel would probably be a better accompaniment to the apples and cinnamon.

Which lead me to...

Apple Turnover Panini - Attempt #2

Same ingredients and preparation as in Attempt #1, except this time I decided to bypass the apple carmelization step. I also let the turnover stay on the press for 2 minutes longer for the pastry to get more golden and flakier.


THE RESULTS: Even better! Without the carmelization of the apples, I could actually taste the orange juice on the apples, which was nice added flavor. Also, the caramel sauce complemented the apples and cinnamon flavors much better than the chocolate sauce did. We have a winner!

Check out the winning recipe!

Friday, January 18, 2008

Move Over, Grilled Cheese

Okay, I was boring even myself with talk of writing a panini recipe for grilled cheese. Who doesn't know how to make that already? I think we're all well aware of most of the common panini - if not, there are a bunch of great cookbooks to guide us. What would really be more fun would be to push the envelope a little and explore panini creations beyond the focaccia.

What happens if you put puff pastry on the press? Phyllo dough? Seaweed? I'm ready to experiment - and if I destroy this press, well I've always got the Foreman grill :-)

I'm thinking about an apple tart panini...puff pastry or phyllo on the outside. Apples, brown sugar, cinnamon, butter on the inside. Ice cream and caramel sauce probably need to come into play as well. Hopefully tomorrow will be the day I amp things up a bit!

Tuesday, January 15, 2008

More O-spiration

I swear I don't do everything just because Oprah recommends it - but you've got to admit the woman and her staffers often have great taste!

On the show yesterday, Oprah's best friend Gayle King visited celebrity chef Govind Armstrong at his L.A. restaurant, Table 8. The reason? His grilled cheese with pulled shortrib sandwich, which evidently is to die for (the recipe is featured in his new book, "Small Bites, Big Nights: Seductive Little Plates for Intimate Occasions and Lavish Parties"). It got me thinking about grilled cheese...and how good that tastes with some tomato soup on a cold winter day. Granted, in San Diego we don't get too many grilled-cheese-and-tomato-soup days. Still, I think I might give it a go this weekend no matter what the weather might be.

I didn't catch the name of the cheese that Chef Armstrong mentioned he uses in the restaurant, but since I still have the asiago from the other day, I'll probably incorporate that and maybe some fontina and cheddar. I'm also thinking about including some prosciutto and maybe some sundried tomato paste. Dare I pull out the pesto spread again?

Monday, January 14, 2008

The Inaugural Experiment

For my initial foray into panini-making, I thought I'd "play it safe" and try something Italian-inspired (these things were invented around Italian flavors, weren't they?). I'd give this first sandwich a B+.


Chicken, Prosciutto & Asiago - Attempt #1


  • Bread: Focaccia

  • Condiment: Pesto

  • Cheese: Asiago

  • Meat: Chicken breast

  • "Goodies": Prosciutto, Roasted red bell peppers

THE INSPIRATION: One of my favorite Italian dishes is saltimbocca - chicken or veal pounded thin, topped with prosciutto and sage in a white wine sauce. For my saltimbocca panini, I kept the savory chicken and prosciutto combination but then I wanted to add something sweet to the mix - roasted red bell peppers came immediately to mind. All good panini have cheese that melts and holds everything together - I wanted fontina, but settled for asiago when I couldn't find fontina in my grocery store. For a condiment, I went with a pesto spread for the zesty flavors of olive oil, garlic and basil.

THE PREPARATION: I started by brining my chicken breasts for about 45 minutes with salt, black pepper, garlic powder, dried oregano and dried basil. I left them "as is", rather than pounding them, which, in hindsight, may have been a small mistake. Then I sauteed them in extra-virgin olive oil over medium-high heat for 7 mins on each side (covered) and set them aside. I julienned the roasted red bell peppers. That was it for prep (did I mention that much of the appeal of panini to me is the ease of preparation?).

THE CONSTRUCTION (from the bottom up): Focaccia, pesto, roasted red bell peppers, chicken breast, prosciutto, asiago, pesto, focaccia. Toasted on low for 7 minutes.

THE RESULTS: Not a bad sandwich for my first time out! The flavors were terrific - the saltiness from the prosciutto and asiago cheese melded well with the zestiness of the pesto and sweetness of the peppers. The chicken, while flavorful (and cooked to perfection, I might add :-)), was a little too thick for the panino overall. Visually, it dominated the sandwich and was a little unwieldy to eat as well. While I'd planned to use fontina rather than asiago, I ended up liking the "bite" of the asiago after all. I think it's a keeper!

NOTES FOR NEXT TIME: I really wouldn't change much about this panino - like I said, it wasn't all that daring to begin with. I will definitely want to experiment with either pounding the chicken or slicing it lengthwise to bring down the height of the sandwich and balance things out a bit.

A Moratorium on the Appliance Wasteland

Truth be told, I did ask for the panini press.

It's always so enticing to leaf through the latest catalog from Williams-Sonoma or Sur La Table and ogle all the new cooking gadgets. You daydream about how wonderful the house will smell with fresh bread baking in the breadmaker (it's been on the fritz for over a year), delighting your friends with your kitchen-turned-creperie (that was a once-er) and grazing all summer long on homemade ice cream (where's that component I'm supposed to keep in the freezer?). You start with the best of intentions, but inevitably these wonder-tools find themselves a permanent home on your pantry shelves, staring back at you every time you go to reach for a granola bar. At least it's true in my pantry.

Last year Oprah announced the Breville Ikon Panini Press among her "Favorite Things" and, like any good Oprah devotee, I decided I had to have it. I "asked Santa" (my sister) for it for Christmas and it arrived last week. Yes, that's quite a bit after Christmas - so popular it was backordered. On Amazon, several other models of panini presses were completely sold out as well! Clearly, I wasn't the only one giving this gadget a go.

Now that the press is here, I'm determined not to allow one more inhabitant to take up residence in the appliance wasteland that is my pantry. This time will be different. I'm going to experiment a bit and see if I can have some fun with this new toy. I'm going to get "panini happy"!