Thursday, February 28, 2008

Announcing...Panini Pairings!


When I started this blog, I intended to focus it pretty tightly on panini - working out new recipes, discovering new techniques and generally extolling the versatility of these great sandwiches. But (wo)man cannot live on panini alone! Sometimes panini can be meals unto themselves, but often we pair them with a side dish, soup or salad to round it out. While keeping Panini Happy centered around panini, I've decided to launch a Panini Pairings feature.

What are Panini Pairings?

Panini Pairings are three recipes for side dishes, soups or salads that I think will be great accompaniments to the recipes I create on Panini Happy and publish on Panini Happy - The Winning Recipes. At the end of each recipe, you'll find links to the Panini Pairings, which reside on other food blogs. So not only will you have good suggestions for sides, you'll also have the opportunity to discover new blogs. NOTE: These are not paid links.

How do you select the Panini Pairings?

I subscribe to a number of fantastic food blogs, so I keep my eye out for dishes that might now or in the future pair well with panini. Sometimes I have specific sides in mind - that's when I run searches on Food Blog Search (thanks to Elise from Simply Recipes, Kalyn from Kalyn's Kitchen and Alanna from Kitchen Parade for pulling together this great tool!) to find potential recipes. I also accept suggestions from Panini Happy readers.

How can I suggest a Panini Pairing for an existing or future panini recipe?

Send me an e-mail at panini(DOT)happy(AT)yahoo(DOT)com. I'm always on the lookout for good sides, so if you have any, please send them my way. All I ask is that they appear on a blog - I believe in being a good blogger citizen and I'd prefer to promote original or adapted recipes on other blogs rather than commercial sites. That said, if you've got a fave that happens to be on a commercial site I'll consider it. Please don't take offense if I don't post your suggestion right away - there are spots for just three Panini Pairings, so if I don't use yours now I may end up linking to it from a future recipe.

I've started going back through my previous recipe posts and adding in some Pairings - check them out!

Monday, February 25, 2008

The Pineapple Panini Challenge


I never imagined how much fun I would have with making panini all the time! Coming up with new ideas and then trying them out is sort of like a research experiment and an art project at the same time - and those are two activities I've loved my whole life! So when I found out about
the Root Source challenge on Cookthink to come up with a recipe incorporating pineapple, my synapses started firing and I became determined to come up with a creative panini recipe entry. I hit upon a tasty one over the weekend and I'd been looking for time over the past few days to write it up and submit it. I was finally ready to do it this morning, but it looks like I missed the deadline - doh! As many of you know, "deadline" is kind of a foreign term when you've got an infant :-) Oh well, it's still a great sandwich, so I will share it with you all nonetheless! Want to skip ahead? Click here for the final recipe.

Grilled Pineapple, Prosciutto & Goat Cheese Panini - Attempt #1

  • Bread: Ciabatta
  • Condiment: Olive oil
  • "Meat": Pineapple
  • Cheese: Goat cheese
  • "Goodies": Cilantro

THE INSPIRATION: So, as I mentioned, what sparked me to pursue a pineapple panino (say that 3x fast) was a recipe contest whose deadline passed before I had a chance to enter it. Bygones. What inspired me to try this particular combination of grilled pineapple with prosciutto and goat cheese was the Christmas Eve dinner my mom made this past Christmas. She did a baked ham and this wonderful pineapple casserole - kind of a sweet and savory bread pudding. Ham and pineapple is a classic combination and for good reason - it's the salty-sweet thing. But the custard in this pineapple casserole added yet one more savory element that made the whole thing absolutely addictive. So when I went to create this sandwich, I thought goat cheese might yield that same creamy-savoriness - and with the pineapple, prosciutto and a few fresh sprigs of cilantro, the final result had a shot at being a flavorful success.

THE PREPARATION: I learned how to cut up a pineapple in Hawaii a few years ago on my honeymoon. I'm glad I did, because while I can appreciate the canned kind there really is no substitute for the real thing. I cut off the top (I was taught to twist it off with my hands, but this one was sharp - ouch!) and then ran my knife down the sides to remove the outer rind. Then I sliced it cross-wise into 1/2" slices and cut out the core with a paring knife.

As soon as the pineapple slices made contact with the panini grill (at 400 degrees, for a good sear) I heard the sizzle and some pretty nice tropical-like aromas began to fill my kitchen! I learned right away that it's pretty important that the slices all be pretty close to the same height - some of mine were taller than others and as a result only the tall ones were able to see any grill marks. I'll definitely note that in the final recipe. After about 7 minutes they looked done enough to remove from the grill, with a nice caramelization on the outside.

THE CONSTRUCTION: I finally found ciabatta! Not sure why it was so elusive at my local Vons, but I persevered this time and found it at Albertson's instead. I divided my roll into four individual-sized pieces and split them lengthwise. I didn't really have a special condiment in mind for this panini recipe - I wanted the pineapple to be the star and there were already other strong flavors - so I went with just a simple drizzle of olive oil inside both halves of the bread. I lay a slice of prosciutto on the bottom piece of ciabatta and then topped it with a slice of the grilled pineapple, two 1/4" thick medallions of goat cheese, a few pieces of cilantro and the top half of ciabatta.

After cleaning off the panini grill and lowering the heat to 350 degrees, I put on the sandwich to grill at medium height for 7 minutes.

THE RESULTS: Just what I'd hoped for! The photo doesn't really do it justice - yes, it's a little bit messy but for what it might lack in aesthetics it more than makes up in terms of taste and texture. The crunch of the grilled ciabatta is almost satisfying enough in itself - but the fillings are not to be outdone. The pineapple, which is plenty sweet on its own, is especially candy-like with the caramelization it obtained from the grilling. It's complemented very well by the salty prosciutto - the thin slice is just enough to give the smoky ham flavor without taking away from the featured attraction. The mild and creamy goat cheese, as hoped, provided a nice, savory balance. And the cilantro...well, I just love cilantro (sorry, Mrs. Nudelman!!). It brings a freshness to whatever you put it in and this sandwich was no exception. All in all, I really enjoyed this sandwich. It may not have been entered into any contests, but hopefully you'll find that it's a winner! (I even cheesed myself out with that one :-))

Get the final recipe!

Wednesday, February 20, 2008

8 Tips for Making Great Panini

Panini have been around for centuries, and these days they're being grilled up in practically every corner café in America. The popularity of grilling panini at home reached a fever pitch when Oprah Winfrey featured the Breville Ikon Panini Press among her 2007 "favorite things". That model (which I use) and many others began selling out in housewares stores everywhere. Here are 7 tips that will ensure that the panini you make at home are as scrumptious as can be.


1. Choose your grilling method wisely. As I learned in the "Grill Method Smackdown", not all panini grilling methods yield the same results. A panini press may be the easiest to use and provide the greatest amount of control over heat and pressure, but it's also the most expensive option. Many people are able to grill sandwiches just fine with a grill pan and/or skillet...although this method can be unwieldy and cumbersome to execute. It all comes down to your personal taste and, perhaps, the frequency with which you plan to grill panini.

2. Experiment with a variety of breads and fillings. Just because panini originated in Italy doesn't mean you have to limit yourself to foccacia, mozzarella and other Italian ingredients. Or even just savory ingredients. If it's got bread and fillings and is prepared on the grill, it's a panino! Try dessert recipes, breads like pita and biscuits, and fillings like mango salsa and apples. Let your taste buds be your guide and have fun with it!

3. Go for the crunch. What separates panini from "regular" sandwiches? It's the grilling! Grilled bread is the hallmark of panini - make the most of it by brushing olive oil or melted butter on top for a crostini-like crunch. Or, to save a few calories, Columbus Foodie recommends spraying butter flavored cooking spray, another great idea.

4. Be careful with "wet" ingredients. No one likes a soggy sandwich. Many of the great fillings we enjoy on "regular" non-grilled sandwiches, such as tomatoes and juicy meats, sometimes aren't ideal candidates for panini, where crispness is key. Does that mean these fillings are out of the question (and the panini) entirely? Absolutely not! Just look for ways to contain the excess moisture. For example, add panko breadcrumbs to fish and remove seeds from tomatoes. Another great tip comes from celebrity chef Tom Colicchio (thanks to Foodie Obsessed for mentioning it!): put your wet ingredients in the center of the sandwich.

5. Keep round tops turned in. If you try to grill round-topped breads, like baguettes, you'll find it can be a real challenge to keep them from rolling over and spilling out the contents of your panini. The answer to this dilemma - a great technique I heard about on the Baking Bites blog: turn round-topped breads inside out so that the flat surfaces make contact with the grill. Genius!

6. Cut with a straight-edged knife. A sharp, straight-edged knife, rather than a serrated one, will ensure a smooth separation for your finished panini.

7. Have a panini party! The best to know if your panini are hitting the mark is to test them out on friends and family. Buy a selection of breads and fillings, fire up the grill, and allow your guests to create their own panini combinations. You may even glean some new ideas!

8. Greens go last. Love to include lettuce in your panini, but can't stand to have them wilt in the grilling process? Food Network's George Duran (aka "Ham on the Street") offers a great solution: stick 'em in last. Grill your sandwich and then insert anything you'd like to keep leafy - lettuce, spinach, arugula, cilantro to name a few - right before serving.

Do you have other tips? Share them in the comments!

> More from the Panini 101 series:

Are the tips in this post helpful? If so, give it a Stumble and share it with others who like to cook!

Tuesday, February 19, 2008

Ingredients to Keep on Hand


If you have certain basic items on hand at all times great panini will just be minutes away. Of course, it's all a matter of personal taste. After making a few different panini you'll start to recognize the flavors you like best. Here are some suggestions to get you started.

Bread


MUST HAVE: Sliced sourdough - it grills well and is also excellent for non-grilled sandwiches and breakfast toast, so you're not likely to waste it
NICE TO HAVE: Pita, rye, ciabatta, focaccia, raisin bread, puff pastry, english muffins, french rolls

Cheese

MUST HAVE: Sliced cheddar - goes well with many types of sandwiches, or great as a snack on its own
NICE TO HAVE: Asiago, mozzarella, pepper jack, blue cheese, swiss, havarti, gruyere, provolone

Meat

MUST HAVE: Deli meats - any deli meat can be a good candidate for panini
NICE TO HAVE: Rotisserie chicken, fish filets, eggs, bacon, prosciutto, flank or skirt steak, turkey, shrimp, pulled pork

Condiments

MUST HAVE: Mustard, mayonnaise, olive oil, butter - these versatile ingredients are great accompaniments to nearly all types of panini
NICE TO HAVE: Pesto spread, olive tapenade, sundried tomato spread, mango chutney, peanut butter, preserves

"Goodies"

Often it's the "extras" that make the sandwich: red onion, avocado, apples, spinach, arugula, tomatoes, chocolate

Stock your refrigerator and pantry and get grilling!

More from the Panini 101 series:

Monday, February 18, 2008

The Grill Method Smackdown


Do I need a panini press to make panini? Can I just use my Foreman grill? How about a grill pan or skillet? There seems to be quite a bit of debate on cooking forums over which grilling method makes the best panini? Oh, and people are very adamant that their method is the best. But, you know, I haven't ever seen anyone mention that they've actually tried more than one method...so how can they truly know if one is better than the other? So I decided to make myself the guinea pig upon realizing that I actually had the tools on hand to make panini in three common ways. The truth is, all of these methods will work - BUT, I learned that some methods produce better results and are easier to execute than others. Want to know the pros and cons of each method? Read on!


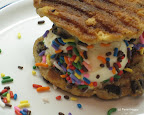
THE TEST SUBJECT: Good ol' basic grilled cheese sandwich - cheddar cheese on sliced sourdough, with melted butter brushed on top. I prepared identical sandwiches using each method.

NOTE: This experiment could hardly be construed as scientific, but will hopefully shed a little light on the differences between three popular panini grilling methods.
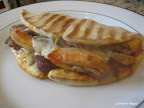


Panini Press


(model tested: Breville Ikon Panini Press, Williams-Sonoma, $99.95)
PROS: Best results, even heating, easy to use, regulate grill height and heat
CONS: Cost, takes longer to heat
Not surprisingly, the machine that was designed specifically to make panini produced the best results! What gives it the advantage is that it allows you to regulate both the grill height and heat, which are vital to making panini that are crispy on the outside, cooked on the inside, and adequately (but not overly!) pressed. My grilled cheese sandwich came out nice and evenly crispy on the outside with perfectly melted cheese on the inside. The grill produced shallow golden grill marks. And it was incredibly easy - just assembled the sandwich, put it on the grill, closed it and the machine did the rest. A perfect grilled cheese sandwich with little fuss - what more can you ask for?

What is the downside to this great gadget? Well, some would say the price. At $100, it's not the cheapest appliance in your pantry. If you anticipate only making panini on very rare occasions, it will probably be difficult to justify the expense. Note that there are, however, a wide range of models available, many of which are less expensive. Also, compared to the other two grill methods I tested, the panini press took the longest to heat up initially and to grill the sandwich. So if time is of the essence, one of the other methods may be preferable.

George Foreman Grill


(model tested: The Champ GR10AWCAN, now discontinued)
PROS: Fastest, easy to use, even heating
CONS: Poor crisping, cannot regulate grill height or heat

Ah, the Foreman grill! So many of us have these tucked away in our kitchens and we love them. But can they make good panini? I would say, "Yes, but..." The model I tested, which I received as a gift about 8-10 years ago, heated up incredibly quickly - in about a minute. Just like with the panini press, it's incredibly easy to use - just load the sandwich on the grill, close it, and wait. Because the heat comes from both the top and bottom it's distributed evenly, which is essentially for good panini. However...

How could I tell the sandwich was done? By the sizzle of a whole lot of cheese that escaped and was bubbling all over the grates! Unfortunately, due to the fact that you cannot regulate the height of the grill (it's possible this feature now exists on newer models - I'd welcome any comments on that), the sandwich was smushed too much, causing the cheese to ooze more than would be desired. Also, even though the heat was distributed evenly, I couldn't regulate it (again, this may now be possible on newer Foreman grill models) so the sandwich cooked too fast and did not come out as toasted and crispy as it did on the panini press. If you're looking to make panini and you've already got a Foreman grill, you may be able to make halfway decent panini without incurring the expense of a panini press.


Grill Pan + Cast Iron Skillet


(models tested: Calphalon One Nonstick 11-Inch Square Grill Pan, Amazon.com, $49.99; Lodge Logic 10-1/4-Inch Pre-Seasoned Skillet, Amazon.com, $12.99)

PROS: Cost (if you already have the pans), grills quickly
CONS: Uneven heating, challenging to regulate grill pressure, cumbersome, FIRE!!

Granted, some people may be more adept at executing this method - but I'm not exactly a novice in the kitchen and I had a really hard time coordinating the two pans to any degree of success and damn near started a fire in the kitchen! The most common reason people advocate this method of grilling panini - pressing a sandwich between two heated pans on the stove - is to save on cost. You've already got the pans, they say, so no need to buy any special apparatus to make panini. And, unlike with my Foreman grill, you can regulate the heat to some extent - at least on the bottom - by adjusting the flame on your stove. As a result, this can be a relatively quick grilling method if you raise the heat high enough.

Alas, due to the fact that you can't regulate the heat on the top, I found I was left with uneven heating. As a result, my sandwich did come out nice and toasty with great grill marks on the bottom...but the upper half of my sandwich actually stuck to the skillet!! If you've ever tried to lift a hot 10" cast iron skillet with one hand (that's currently afflicted with tendonitis due to carrying around an infant!) and a spatula to scrape off half a grilled cheese sandwich in the other you'll know that it is not an easy or particularly safe task! Also, because I was unable to regulate the pressure with which the sandwich was pressed, a lot of cheese escaped out of the sides. I may have had more success if I'd just used one pan - the grill pan - and flipped the sandwich mid-way through. But then I'd need something else heavy, like a foil-covered brick (which I don't have lying around the house) to press it.

And, oh yes, the near-fire - after I'd preheated my skillet I went to lift it with potholders and one of my potholders must have gotten a little too close to the flame. Next thing I know I smell this fume-y odor and notice char marks on the potholder - yikes! I'm just saying...if I didn't have to mess around with maneuvering the skillet (a task I try to minimize) it wouldn't have happened. Perhaps you all are more coordinated than I :-)

The bottom line...

You can make great panini with a panini press, a Foreman grill or a grill pan/skillet - it's all a matter of taste and your preference for convenience, ease and cost. Disagree with any of these results? Try the smackdown in your own kitchen and let us know what you come up with!

More from the Panini 101 series:

Friday, February 15, 2008

A Fish Meandering - Part II


The journey continues! Continuing on from Part I of this fish story, the answer finally hit me as I was strolling at a local strip mall: mango salsa! This panini recipe was lacking vibrance and what says "vibrance" in culinary speak better than mango salsa? Now, of course, that addition does start to deviate from a typical fish taco. Aw heck, who cares? At the end of the day, I wanted a good sandwich and if that meant I had to scrap the San Diego inspiration this go-around, no big deal. I will give the city its due another time, I promise. Want to skip ahead? Click here for the final recipe.

Caribbean Fish Panini - Attempt #3


  • Bread: Sourdough

  • Condiment: Lime dressing

  • Meat: Panko-breaded tilapia

  • Cheese: Pepper jack

  • "Goodies": Mango salsa

Yep, you read right - with the addition of mango salsa, we've now moved on from Baja to the Caribbean! Islands where reggae, calypso and mangoes abound. Not that they don't have mangoes in Baja...they just have more tropical vibe, you know?


THE PREPARATION: Given my previous experience with over-moist ingredients turning the bread soggy, I did want to be careful with the mango salsa. I had to kind of make it more of a mango pico de gallo, without any extra liquid like lime juice. I've never actually made this before but I've eaten it enough times to know the basic flavors I wanted to include: mangoes (obviously), red onion for flavor and color, cilantro for fresh, herb-y flavor and avocados for color and because I love avocado. I toyed with adding a jalapeño pepper for heat, but thought better of it when I remembered that there were already jalapeños in the pepper jack cheese. After combining all the ingredients, I got out a tortilla chip and gave it a taste - excellent!


I altered the breading method just slightly this time: instead of seasoning the fish directly, instead I added 1/4 teaspoon of sea salt to the panko crumbs.


THE CONSTRUCTION: I built the sandwich in the same manner as in Attempt #2, except for this time I substituted the mango salsa in place of the cabbage.


THE RESULTS: Pretty good! The mango salsa gave the sandwich much more flavor than the cabbage had. Plus it looked nice, with the bright colors and all. My only gripe had to do with the avocado - as much as I love it, it came off as bland and mushy in the panino. It had to go. I crossed my fingers that Attempt #4 would be the one!


Caribbean Fish Panini - Attempt #4


I knew I was getting close. I picked out the avocado chunks from my mango salsa and built a fourth - and hopefully final - panino.


THE RESULTS: Yeah, mon! With the removal of the avocado, the mango salsa packed the sweet flavorful punch that I'd intended, without being too wet. The panko-breaded fish was crunchy and light. The lime dressing gave a light flavor and necessary moisture to the sandwich. And the crisp, toasted sourdough encased it all in a satisfying way. This panini recipe may not have ended up where I originally thought it would, but it ended in a great place!

Get the final recipe!

Thursday, February 14, 2008

A Fish Meandering - Part I

Oh wow. If you thought the road to my Chicken, Apple & Raspberry Panini was long and circuitous you're not gonna believe what it took to work out my fish sandwich recipe! I started out looking to pay tribute to my current hometown, San Diego, but somehow made my way thousands of miles east to the Caribbean. This is going to be a two-parter - on account of it took me a second kitchen session to arrive at the right combination. Keep with me, it ends well! Want to skip ahead? Click here for the final recipe.

Baja Fish Panini - Attempt #1

  • Bread: Sourdough
  • Condiment: Lime dressing
  • Meat: Tilapia
  • Cheese: Pepper jack
  • "Goodies": Cabbage

THE INSPIRATION: San Diego isn't exactly what one would call a "food town", but there's at least one menu item we can claim with pride: fish tacos. Actually originating in Baja California, Mexico, the typical fish taco consists of a corn tortilla with breaded white fish, cabbage and a creamy dressing. Ralph Rubio, the founder of the Rubio's Mexican fast casual restaurant chain is often credited with popularizing the fish taco north of the border and it has become a local favorite. So I wanted to use the fish taco as inspiration for a panini recipe.

THE PREPARATION: "To bread or not to bread?" As I mentioned, the fish in fish tacos is usually breaded. Outside of chicken parms, I can't recall too many occasions where I've had breaded items on a sandwich, so I thought I'd better test out whether breaded fish would work well or not. In Attempt #1, I went without the breading. I brushed a tilapia steak - I went with tilapia because it's often serving-sized, readily available and relatively inexpensive - with olive oil, seasoned with salt and pepper, and squeezed a little lime juice on top.

Now, in my previous panini recipes I've always pre-cooked fillings on the stove or in the oven, but it occurred to me that with fish I could actually use the panini grill in the prep phase! So onto the grill went the tilapia at 350 degrees - it took about 2 minutes and 30 seconds to get cooked through and juicy. That's about as fast as the microwave!! But a microwave won't give you grill marks :-)

Next, I worked on my condiment: the fish taco sauce. I did a little research and it seems the most typical recipe for fish taco sauce calls for equal parts of sour cream and mayonnaise and some lime juice.

THE CONSTRUCTION: I whisked together the sauce and spread some onto a slice of sourdough bread. Then came about 1/2 cup of coleslaw mix (no sense in shredding my own!), the grilled tilapia, a slice of pepper jack cheese (for a little heat as well as an adhesive) and another slice of sourdough bread. I brushed some olive oil on top to make it extra crispy and flavorful.

I cleaned off the panini press and put the sandwich on to grill for about 5 minutes until the top was crispy and golden and the pepper jack had melted.

THE RESULTS: Only okay. It was too wet - the downside to a juicy filling like tilapia, I learned, is that the moisture can make bread a little soggy. The pepper jack featured prominently...too prominently, I tasted it more than anything else. My husband commented, "I taste pepper", which let me know that the freshly ground black pepper I'd seasoned the fish with was also nonharmonious. This sandwich had lots of issues - I could sense I was going to be a while longer in the kitchen!

Baja Fish Panini - Attempt #2

"To bread or not to bread?" I had to ask the question again. Perhaps the moisture of the tilapia could be "contained" within a breaded shell? I decided to give it a try, dipping another piece of tilapia first in a beaten egg and then in some Japanese panko bread crumbs. I like panko crumbs because they're crunchier than the finer bread crumbs we more often use. The texture could be great in the sandwich.

With the breading, the tilapia took a little longer to grill - closer to 6 minutes. Still not bad!

I built the sandwich again in the same manner as in Attempt #1, substituting the breaded tilapia for the grilled fish.

THE RESULTS: Well, it wasn't nearly as wet...but it still didn't really taste that great. It needed some punch. The pepper jack definitely provided a kick, but it needed another complementary kick - a sweet kick perhaps? The cabbage also wasn't really working for me. Raw cabbage may bring a nice fresh, crisp texture to a fish taco, but on a grilled sandwich the now-cooked cabbage was rather bland and soft. Not exactly what I was going for!

It was now time to feed the baby again and I was out of sourdough and ideas. I resolved to think on it overnight and continue testing ideas the next day. I will make this fish panini recipe work!

See how this "fish story" ends - check out Part II.

Tuesday, February 12, 2008

A Chicken Meandering

Sometimes I hit upon a great sandwich on the first try, and other times...well, it goes the way it went this past weekend. I started with dreams of a relatively easy chicken sandwich, incorporating flavor combinations I've loved in various appetizers - chicken and apples, apples and brie. But as I'm discovering, once some of these flavors are grilled and melted together between two pieces of bread the final dish can be fantastic OR it can be a disaster. I'll tell you what, if it weren't for this blog I'd probably give up on some of these ideas after a few tries. But where would be the fun in that? With your entertainment (and eventual recipe interest) in mind, I perservere! Fortunately, I eventually arrive at some tasty results. Want to skip ahead? Click here for the final recipe.

Chicken, Apple & Brie Panini - Attempt #1

  • Bread: French sandwich roll
  • Condiment: None
  • Meat: Rotisserie chicken
  • Cheese: Brie
  • "Goodies": Granny Smith apples

THE INSPIRATION: I really don't buy rotisserie chickens often enough. They're inexpensive, readily available and generally taste pretty good (owing to the much greater amount of salt than I would have been able to justify using). This "instant chicken" has made it possible for me to prepare a number of great mid-week meals in no time. So it seemed to me that there must be a good role for rotisserie chicken in panini-making. That was the impetus. From there, I brainstormed flavors that taste good with chicken and I came up on apples, like in some chicken salads. And then from apples my mind went to brie, another great combo. And so Attempt #1 became an experiment in combining rotisserie chicken, apples and brie.

THE PREPARATION: Pulling chicken meat from its carcass feels barbaric...and somehow gratifying. Fresh from the grocery store, it's still hot and slippery through your fingers. That's one way Pulled Chickenof looking at it - the other is that it's kind of a mess. I must credit Ms. Rachael Ray for her popularization of a "GB" (aka, garbage bowl) - it saves my countertops every time.

Next, I sliced up my brie into 1/4" slices. I had some concerns about its sharpness being too overpowering - I don't think I've had a sandwich with brie yet from which I didn't have to scrape off half the cheese to make it edible. Still, I wanted cheese to bind this sandwich and brie was my chosen adhesive.

For apples, I went with Granny Smith for their tartness and dense consistency - after the Apple Turnover Panini, I knew they'd stand up well to the heat without becoming mushy. I cut up my apple into 16 pieces and squeezed lemon on them to prevent oxidization.

THE CONSTRUCTION: Onto a French sandwich roll, I layered 2 small slices of brie, my rotisserie chicken meat (a good balance of light and dark meat), 4 slices of apple, and another 2 slices of brie.


This sandwich didn't even make it to the grill - it was immediately apparent that there was no way its tubular shape would allow it to remain upright. Now, I have since learned of a great trick to mitigate this problem - turning the bread inside out so that the round sides are facing in - but I was not aware of this at the time. So I made the switch to sliced sourdough (an upside to writing this blog is that I have no shortage of breads and cheeses in my kitchen these days!), brushing a little olive oil on top for a crostini effect. I grilled the sandwich at 350 degrees for 6 minutes.

THE RESULTS: Yuck. The brie was way too strong. Maybe it was the brand I bought, I don't know. The chicken and the apples were fine and I loved how the bread, with the olive oil, came out so nice and crispy. But what's panini without good cheese? I was going to need to revisit this.

Chicken, Apple & Asiago Panini - Attempt #2

Brie was too strong, how about something a little milder like asiago? I had some leftover from the Inaugural Experiment and I thought that, too, is usually a great accompaniment to chicken and apples. So I swapped in asiago in place of the brie and kept the rest of the sandwich the same.

THE RESULTS: Much better! With the brie gone, I could actually taste the chicken and apples this time. I could even pick up a little of the lemon juice I'd used to keep the apples from browning. But it was a touch dry and more bland than I'd hoped. I realized I didn't have any condiments on the sandwich - just meat, cheese and a "goodie" (the apples). At first I considered adding cranberry sauce, but insofar as Thanksgiving was months ago I didn't quite have any on hand! I did, however, have some raspberry preserves from the Chocolate Raspberry Croissant Panini for Two. Might that give the moisture and sweetness I was looking for?

Chicken, Apple & Raspberry Panini - Attempt #3


Instead of using asiago on the inside of both pieces of bread, I substituted a layer of raspberry preserves on the bottom half...and crossed my fingers!

THE RESULTS: WINNER! Yes, it was sweet but not too sweet. It was just what the sandwich needed to balance out the saltiness of the chicken and the asiago and the tartness of the apples.

This recipe definitely took a meandering path, but after a little perserverance I'm proud to say I've come up with a relatively easy chicken sandwich with unexpected - yet delicious - flavors.


Get the final recipe!

Thursday, February 7, 2008

Chocolate + Raspberries = Valentine's Day!


Is there anything better than chocolate to create a romantic mood with food on Valentine's Day? I wanted to come up with a chocolate panini recipe that truly was a proper dessert - not just chocolate between two pieces of bread. It wasn't easy - a chocolate sandwich is the kind of thing you dream about as a kid (along with Cookie Crisp cereal - whose mom let them eat that?!) but most of us rarely, if ever, actually make. Except if maybe you count a Nutella sandwich. Those are good, but you can hardly call it a special occasion romantic dessert. No, I was looking to make something decadent, a little bit refined, but still relatively easy to prepare. I think my Chocolate Raspberry Croissant Panini fits the bill! Want to skip ahead? Click here for the final recipe.

Chocolate Raspberry Croissant Panini...for Two! - Attempt #1

  • Bread: Croissant
  • Condiment: Raspberry preserves
  • "Meat": Semi-sweet chocolate
  • Cheese: None
  • Goodies: Crème anglaise
THE INSPIRATION: Valentine's Day was, for sure, the impetus for my thoughts on a chocolate panini recipe. Now that we're new parents of a 2-month old, my husband and I will be dining in on Valentine's Day this year. Nonetheless, I still want to at least make a special dessert for the two of us. Since my husband enjoys croissants (and raisin bread and cinnamon rolls and bagels and pretty much any kind of bread or pastry you can name!) I thought they would be a great choice for the bread in my sandwich. The idea for raspberries also came from him - which actually came as a bit of a surprise, in that he usually doesn't care for fruit with chocolate. But I totally agreed with him that raspberries and chocolate is a great pairing - plus, raspberries kind of look like little hearts, don't they? Finally, the idea for crème anglaise came from the many pastry desserts I've had over the years that incorporated it - yum! That would be the homemade part of this "semi-homemade" dessert - I think Sandra Lee of the Food Network would be proud!

THE PREPARATION: I started with the crème anglaise. If you're not familiar with creme anglaise, it's a thin dessert custard sauce made with sugar, egg yolks, cream and vanilla. It's fantastic and although it took a little extra time to make, I knew it would be worth it. I did a little online research to find out the basic proportions and made a few adjustments based on the rich, sweet taste I was going for.

In a medium bowl, I whisked together 3 egg yolks with 1/4 cup of sugar and set it aside. Then I heated 1/2 cup of whole milk, 1/2 cup of heavy cream and good vanilla (as my favorite Barefoot Contessa, Ina Garten, would say!) over medium heat in a heavy saucepan, stirring constantly until the milk began to simmer. Then I gradually stirred the milk into the egg mixture - I "tempered" the eggs by pouring just a little of the milk in first to raise the temperature (I could hear Ina say, "You don't want scrambled eggs!".

I cleaned my original saucepan, scraping off the inevitable cooked-on bits, and transferred the now-custard back in. I heated the custard over low heat, stirring constantly with a wooden spoon to try and keep the custard from cooking onto the pot. I took it off the heat once it was slightly thickened and I could draw a line on the back of a spoon (I watched Bobby Flay do this on "Iron Chef" the other night - Alton Brown mentioned this was called napé). Then I strained the custard into a small bowl and let it cool for about 10 minutes.

THE CONSTRUCTION: While the crème anglaise cooled, I got started on preparing the actual sandwich. I cut an opening along the inside of the croissant to create a little pocket to hold the chocolate and raspberry preserves. I spread 2 teaspoons of the preserves within the pocket and then lay about an ounce of semi-sweet Ghirardelli chocolate on top of the preserves (as a Bay Area native, my heart belongs to Ghirardelli...Scharffen Berger would have been great as well!).
With the panini grill at medium height, I grilled the croissant at 350 degrees for 10 minutes until the chocolate had melted.

While the croissant was grilling, I melted more chocolate to drizzle later as a garnish. This time, I used Ghirardelli semi-sweet chocolate chips, melting 1/2 cup of them in the microwave.

I gave a lot of thought to how I wanted this chocolate sandwich to look on the plate - after much deliberation I decided I wanted to see a drizzle of chocolate on the croissant but not on the plate. So once the croissant was done grilling, I transferred it to a piece of parchment paper and did my drizzle on the parchment. Over on the dessert plate, I spooned 3 tablespoons of my crème anglaise to create a little pool in the middle (alas, there was quite a bit of extra crème anglaise, but oh well - it's not like you can just make 3 tablespoons of it!). Then I centered the chocolate-drizzled croissant amidst the vanilla pool. Finally, I picked out a particularly luscious raspberry from the bunch and placed it where the two ends of the croissant met.

THE RESULTS: A winner right out of the gate! It turned out just as I'd hoped: grilling on the panini press made an already-flaky croissant extra crispy on the outside, while heating the gooey chocolate-raspberry center. The raspberry preserves were an excellent complement to the chocolate (great suggestion, dear husband!) and the crème anglaise provided the rich vanilla flavor and smooth texture that finished off the dessert panino perfectly. I'm definitely calling this a "dessert for two" as it's probably too rich to be served as an individual serving. It's just as well...it is, after all, designed for Valentine's Day!

Click here for the final recipe!


Looking for more great Valentine's Day recipes? Check these out from my fellow food bloggers:

Sunday, February 3, 2008

Eggplant to the rescue!


I decided to "go healthy" this time around. It didn't really dawn on me that I tend to gravitate toward the comfort end of the dining spectrum until my friend Karen let me know about her blog, Test Drive Kitchen in which she tests out healthy recipes. Now, I'm not apologetic for my apple turnover, calzone, egg biscuit or Buffalo chicken...but I suppose it wouldn't be so bad for me to balance all that comfy stuff with a healthy option every now and then! Yes, I have food guilt. Especially knowing the decadent panini recipe I've got coming up for Valentine's Day, I figured now would be as good a time as any to go for something lighter :-)

Want to skip ahead? Click here for the final recipe!

NOTE: Due to a camera memory card malfunction, most of the photos I took this time around converted to "corrupted data", so said the LCD screen. I will do my best to verbally depict!

Roasted Eggplant & Red Pepper Grilled Cheese Panini - Attempt #1

  • Bread: Baguette
  • Condiment: Marinara on the side
  • "Meat": Eggplant, Red bell peppers
  • Cheese: Fresh mozzarella, Italian cheese blend
  • "Goodies": None
THE INSPIRATION: I should admit that I didn't set out to do a grilled cheese recipe per se. I did look to try something healthier and to incorporate roasted eggplant, a vegetable I've come to love in recent years. Eggplant parmesan was actually my original inspiration for this sandwich - a sandwich with wonderful eggplant and cheese and sauce. For better or for worse, as you'll see, the translation from a main dish to a sandwich isn't an easy one. Sometimes you just have to let the ingredients speak to you - this day, they told me they wanted to become a lighter grilled cheese!

THE PREPARATION: I started by slicing 2 Japanese eggplants lengthwise into 1/2" slices. I had originally planned to use the big eggplants we typically use for eggplant parmesan, but it occurred to me in the supermarket that the smaller, narrower Japanese variety would fit a little better on the bread. I lay the slices on a rimmed baking sheet, brushed 2 tablespoons of olive oil on them, seasoned them with sea salt and freshly ground black pepper and put the baking sheet under the broiler for about 5 minutes. I came a little close to burning them (doh!) so I think 4-5 minutes would probably have been better. I took one for a little taster - nice!

I had originally intended to try this on ciabatta but, once again, the grocery store didn't carry it (Vons, if you're listening, please start stocking ciabatta bread!!). So I went with a french baguette instead, which I found out can be a touch more roly-poly on the panini grill than is ideal. More on that later. I cut the baguette into 4-5" pieces and sliced each piece lengthwise to create top and bottom halves.

THE CONSTRUCTION: I began to layer the roasted eggplant slices with cheese and marinara a la parmesan:
  • a tablespoon of marinara
  • a tablespoon of Italian blend shredded cheese
  • a slice of eggplant
  • another tablespoon of marinara
  • 2 pieces of fresh mozzarella (enough to fit the length of the bread)
  • another tablespoon of marinara
  • a slice of eggplant
  • another tablespoon of shredded cheese
  • a final tablespoon of marinara
Looking at the list now, I should have had a clue that all that marinara probably would not fare too well! But sometimes you just have to try.

I put the sandwich on the panini grill toward the back on low heat and, wouldn't you know, all the contents slid out immediately! Lesson learned: exercise caution when dealing with tubular-shaped bread and a high-profile sandwich. With the help of a spatula I managed to shove everything back in place and this time moved the sandwich toward the front of the grill. There was much less forward-pushing action this time.

THE RESULTS: Not great. All the marinara really made the bread soggy, which isn't too appetizing. Obviously, the slippage that occurred when grilling the sandwich was a problem as well. Not only would it have been better to grill the sandwiches toward the back of the panini grill, it also might be better to use a higher grill height (again, to minimize the impact to the sandwich contents). All I really needed was to toast the bread and melt the cheese so grilling "low and slow" wasn't really necessary - it could have gone on higher heat.

Roasted Eggplant & Red Pepper Grilled Cheese Panini - Attempt #2

For Attempt #2, I cut back on the marinara, adding it only on top of each eggplant slice and not directly onto the bread. I raised the heat on the grill to 350 degrees to try to melt the cheese faster and get more of a toast on the bread. Finally, I flattened the sandwich with my hand first to minimize the chance of everything sliding out.

THE RESULTS: Still not quite what I'd hoped for. Flattening the sandwich prior to grilling definitely improved the slide factor - it stayed pretty intact for the most part this time. Even though I didn't apply the marinara directly to the bread, it still made its way on there and became soggy. It also just plain didn't look that good. I needed to turn this thing around!

Roasted Eggplant & Red Pepper Grilled Cheese Panini - Attempt #3

All right, we were gonna get a good sandwich here! I abandoned the marinara altogether - no soggy bread on my watch! But I still wanted to see something red and flavorful between the bread. I pulled out my jar of roasted red bell peppers (leftover from my Inaugural Experiment) and cut a piece to fit the sandwich. So now I had just cheese and vegetables on the sandwich - no condiments. Perhaps this sandwich wanted to be a grilled cheese after all! By using the eggplant and red pepper I was able to cut out some of the cheese yet still have great flavor. A healthy alternative for those of us still honoring our New Year's resolutions to eat better.

THE RESULTS: Aha! This one was good. No soggy bread - hurray! It was warm and crispy and cheesy just like a good grilled cheese should be. Now, I do still love my marinara. My husband thought of the perfect solution - marinara for dipping on the side! That way the sandwich can still benefit from that zesty kick (just like the classic grilled cheese and tomato soup combo) without having the sauce spend a long time seeping into the bread and getting soggy.

Click here for the final recipe!